Cedar Deck
Ahhh, our deck. We’ve been blessed with an incredibly generous friend in Roy Crosty, the owner of Cedar Village/Allweather Wood, who, as a gift, gave us the materials necessary to build our first deck. A Cedar Deck, no less. He also helped us design the follow deck plan:
As you can see, it’s a two-tiered design, partly due to the presence of a basement window on the north east side of the house.
I began construction began on May 31st (IIRC) and finished on June 2nd (I actually took three days off to complete construction). Thus, total construction time was around 3 solid man-days.
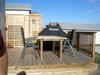
Anyway, time for some photos! Here we have shots of the completed framing:
As you can see, it’s all pressure treated, and the lower tier is supported on deck blocks. Next are the shots of the product after decking was installed. The first is a panorama I tried to put together:
Next is an elevation shot:

Incidentally, after construction, I realized that the beam on the lower deck was leaned forward slightly. Apparently things shifted during construction:
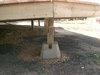
As a result, I ended up pulling off the deck boards above the beam, unscrewing the joists, shifting it back, and then putting everything back to together. Amusingly, the result is that the north east corner of the lower tier is now slightly higher than the north west… oh well, nobody’s perfect, and it was my first major construction project. :)
The last task is to install the railing and stairs. Fortunately, they’ve been planned out and the materials ordered, and so now we’re just awaiting delivery before I can begin the final stage of this rather largish project.
The Railing
So, around the end of July, I finally got my… stuff… together and got moving on the railing. The materials took a little while to show up, primarily because of:
- Weather
- The delivery guys dropping off only half of the original picking order.
But, eventually, it was all present, and I got going. So I took the 20th, 21st, and 24th of July off, and the process began.
The Lattice
The first step was getting the lattice installed, which, as it turns out, is a lot more work than it sounds. Unfortunately, I didn’t take photos of the construction process, but it went something like this:
- Notch out 4x4 posts for later installation on the deck.
- Build frame from two 4x4’s for the ends, one 2x4 center support, and 2x4s for the top and bottom plates. This basically involved building a frame around the pre-built cedar panels.
- Attach frame to deck using carriage bolts and nuts with washers.
- Install lathing on back portion of frame.
- Install lattice panels.
- Install lathing on front portion of frame.
The last three steps might bear some explanation. The lattice panels are never actually fastened to the frame. Instead, they’re sandwiched between two sets of lathing, which are themselves screwed to the interior of the frame.
The Railing
Anyway, with that done, the railing came next. This process was, I think, a little easier than building the lattice:
- Install 4x4s (easy, since they’re pre-notched). Getting them roughly level is good.
- Install 2x6 top cap using deck rail ties.
- Measure 2x4s to fit between posts. Notch out top 2x4 to accomodate deck rail ties.
- Install top 2x4 flush with 2x6, and bottom 2x4 3” from deck surface.
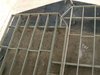
The rail ties were rather interesting. Their purpose is to attach the 2x6 top cap to the 4x4 posts. The big advantage they provide is that it allows you to attach the top cap without needing to install any screws from the top, leaving the rail surface nice and smooth. The result is more attractive and lower maintenance, since it’s easier to stain and you don’t have to worry about water pooling around the screws. Below, you can see a rough diagram I made which illustrates their use:

The red triangle is the tie itself. As you can see, you screw the tie to the post, place the 2x6 in top, and then screw the tie to the 2x6. Pretty damn clever, I think. The only trick is you need to notch the top 2x4 (which runs under the 2x6) to accomodate the tie.
Anyway, the overall framing stage was pretty easy. There were only two tricky bits. First, there is a straight 90 degree turn on the upper deck, which was pretty easy. This required the top caps to be cut to accomodate the corner. Two 45 degree cuts, one on each 2x6, were all that was necessary (minus much tweaking to try and get them nice a flush… which they’re not).
The lower deck rail, on the other hand, was far more tricky, thanks to that nice little angle there (as per the deck plan). In order to install the top cap, it was necessary to make 4 22 degree cuts, one on the north 2x6, one on each end of the 2x6 cap which covers the angle, and one on the west 2x6. Good times. Especially when you don’t have a miter saw. Much fine tuning was necessary.
But that’s not all! The ends of the 2x4s on that angle needed to be bevelled as well, in order to attach them to the 4x4 posts. And even better than that, the top 2x4 needed to be notched out for the rail ties, and the notch needs to be on an angle as well! It was also important to install the 2x4s on the inside faces of the 4x4s, in order to ensure space for the ballisters on the outside of the deck.
The Ballisters
This was, hands down, the easiest part. I simply measured the distance from the bottom of the rail cap to the bottom of the lower 2x4, cut the ballisters to length, and installed them.
Of course, cutting can be a tedious task. This is doubly true since I wanted to cut an angle into the bottom of the ballisters. To make this as easy as possible, I picked up a miter box, installed it on a 2x6, and then screwed a stop (just a piece of scrap wood) to the 2x6 such that the distance from the 45 degree slot on the box to the stop was the exact length I needed. At that point, cutting was simply a matter of placing the piece in the box, butting it up against the cap, clamping and cutting (yes, I hand cut them all :). This was made easier because, miraculously, the length for the ballisters was exactly the same for the whole rail.
The installation process was also pretty simple:
- Determine the number of ballisters between the posts.
- Measure distance between posts.
- Divide by 5.5. This is because each ballister is 1.5” wide, and they need to be spaced 4” apart.
- For an even number of ballisters:
- Find the center between the 4x4s.
- Measure 2” to each side and mark.
- Install first ballister to the right of the right-hand mark.
- Work right from that ballister, installing each one 4” from previous.
- Return to center, then work left.
- For an odd number of ballisters:
- Find the center between the 4x4s.
- Measure a little over 3/4” to each side and mark.
- Install ballister between marks.
- Work right and left from center ballister, installing each one 4” from previous.
Pretty easy stuff. I also made sure to start the screws in the ballisters before installing, which made things even easier.
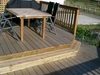
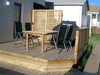
The Pictures
So, what does it look like? See below:

The First Stair
Because our deck has two tiers, I needed to build a stair between the levels. Fortunately, only one stair was needed, which made the project pretty simple. It’s basically a box, built with a 2x6 outside stringer and blocking attaching the stringer to the upper deck, and decking which serves as the stair surface.
Now, it ain perfect. The angles don’t line up nicely with the deck, it stops a little short of the upper tier, and the 2x6 stringer as an ugly little patch in it where I cut the original 2x6 too short and had to install an extra piece (I kinda sorta planned it wrong :). But, it does the job.
The Pictures
You can see the end result below: