
Sock Knitting 101
Someone recently asked me for pointers to good sock knitting lessons. Not a pattern. Lessons on how to really grok knitting socks. So I decided to try throwing something together, specifically for how I approach toe-up socks! Warning, this is definitely a first draft, so it’s very possible I’ll come back and update this post to fix things up…
So, way back in the before time, I decided to attempt to knit a pair of socks. Not one to do things the normal way, I opted for the toe-up lessons from Denise Powell on the now defunct socknitters.com. The thing that really attracted me to toe-up was the idea that I could just try socks on as I went rather than trying to nail the sizing up front, something that, as a not very confident knitter, I didn’t think I had a hope in heck of getting right.
Now, many years later, I can’t imagine knitting socks any other way. Toe-up just feels inherently intuitive to me (though, admittedly, it isn’t without its downsides, as most patterns are set up for cuff-down socks, which means you’ve gotta do extra work to reverse them).
In part, I think this is because of Powell’s approach to teaching sock knitting, which did away with teaching the reader to follow a rote pattern, but instead focused on the structural elements of socks and how you knit each component. This gave the reader a much more fundamental understanding of sock construction, thereby helping the knitter build that necessary intuition that allows for later improvisation.
Well, I decided to take a crack at writing a new set of lessons inspired by Denise’s work and my own experiences both knitting socks and teaching others to do the same. I hope this is useful to aspiring sock knitters out there!
Prerequisites
Sock knitting is nowhere near as technically difficult as a lot of people might think. Odds are, if you’ve knitted a hat in the round, you have 90% of the skills you’ll need to knit socks. However, I will be merrily using some knitting techniques and terminology that a neophyte may not have yet encountered. To follow along I expect you’ll be familiar with:
- Knitting in the round (surprise!)
- Left and right leaning increases
- Simple decreases
- Basic short row knitting (I use a simple wrap-and-turn for the heel)
- Twisted stitches/knitting and purling through the back loop
If anything on this list is totally alien to you, it’s definitely worth digging up a quick tutorial for some of these concepts!
Anatomy of a sock
Like a lot of garments, regardless of the pattern you choose, all knitted socks are made of a number of distinct parts or phases of construction, and so the steps in these lessons explain the construction of these parts.
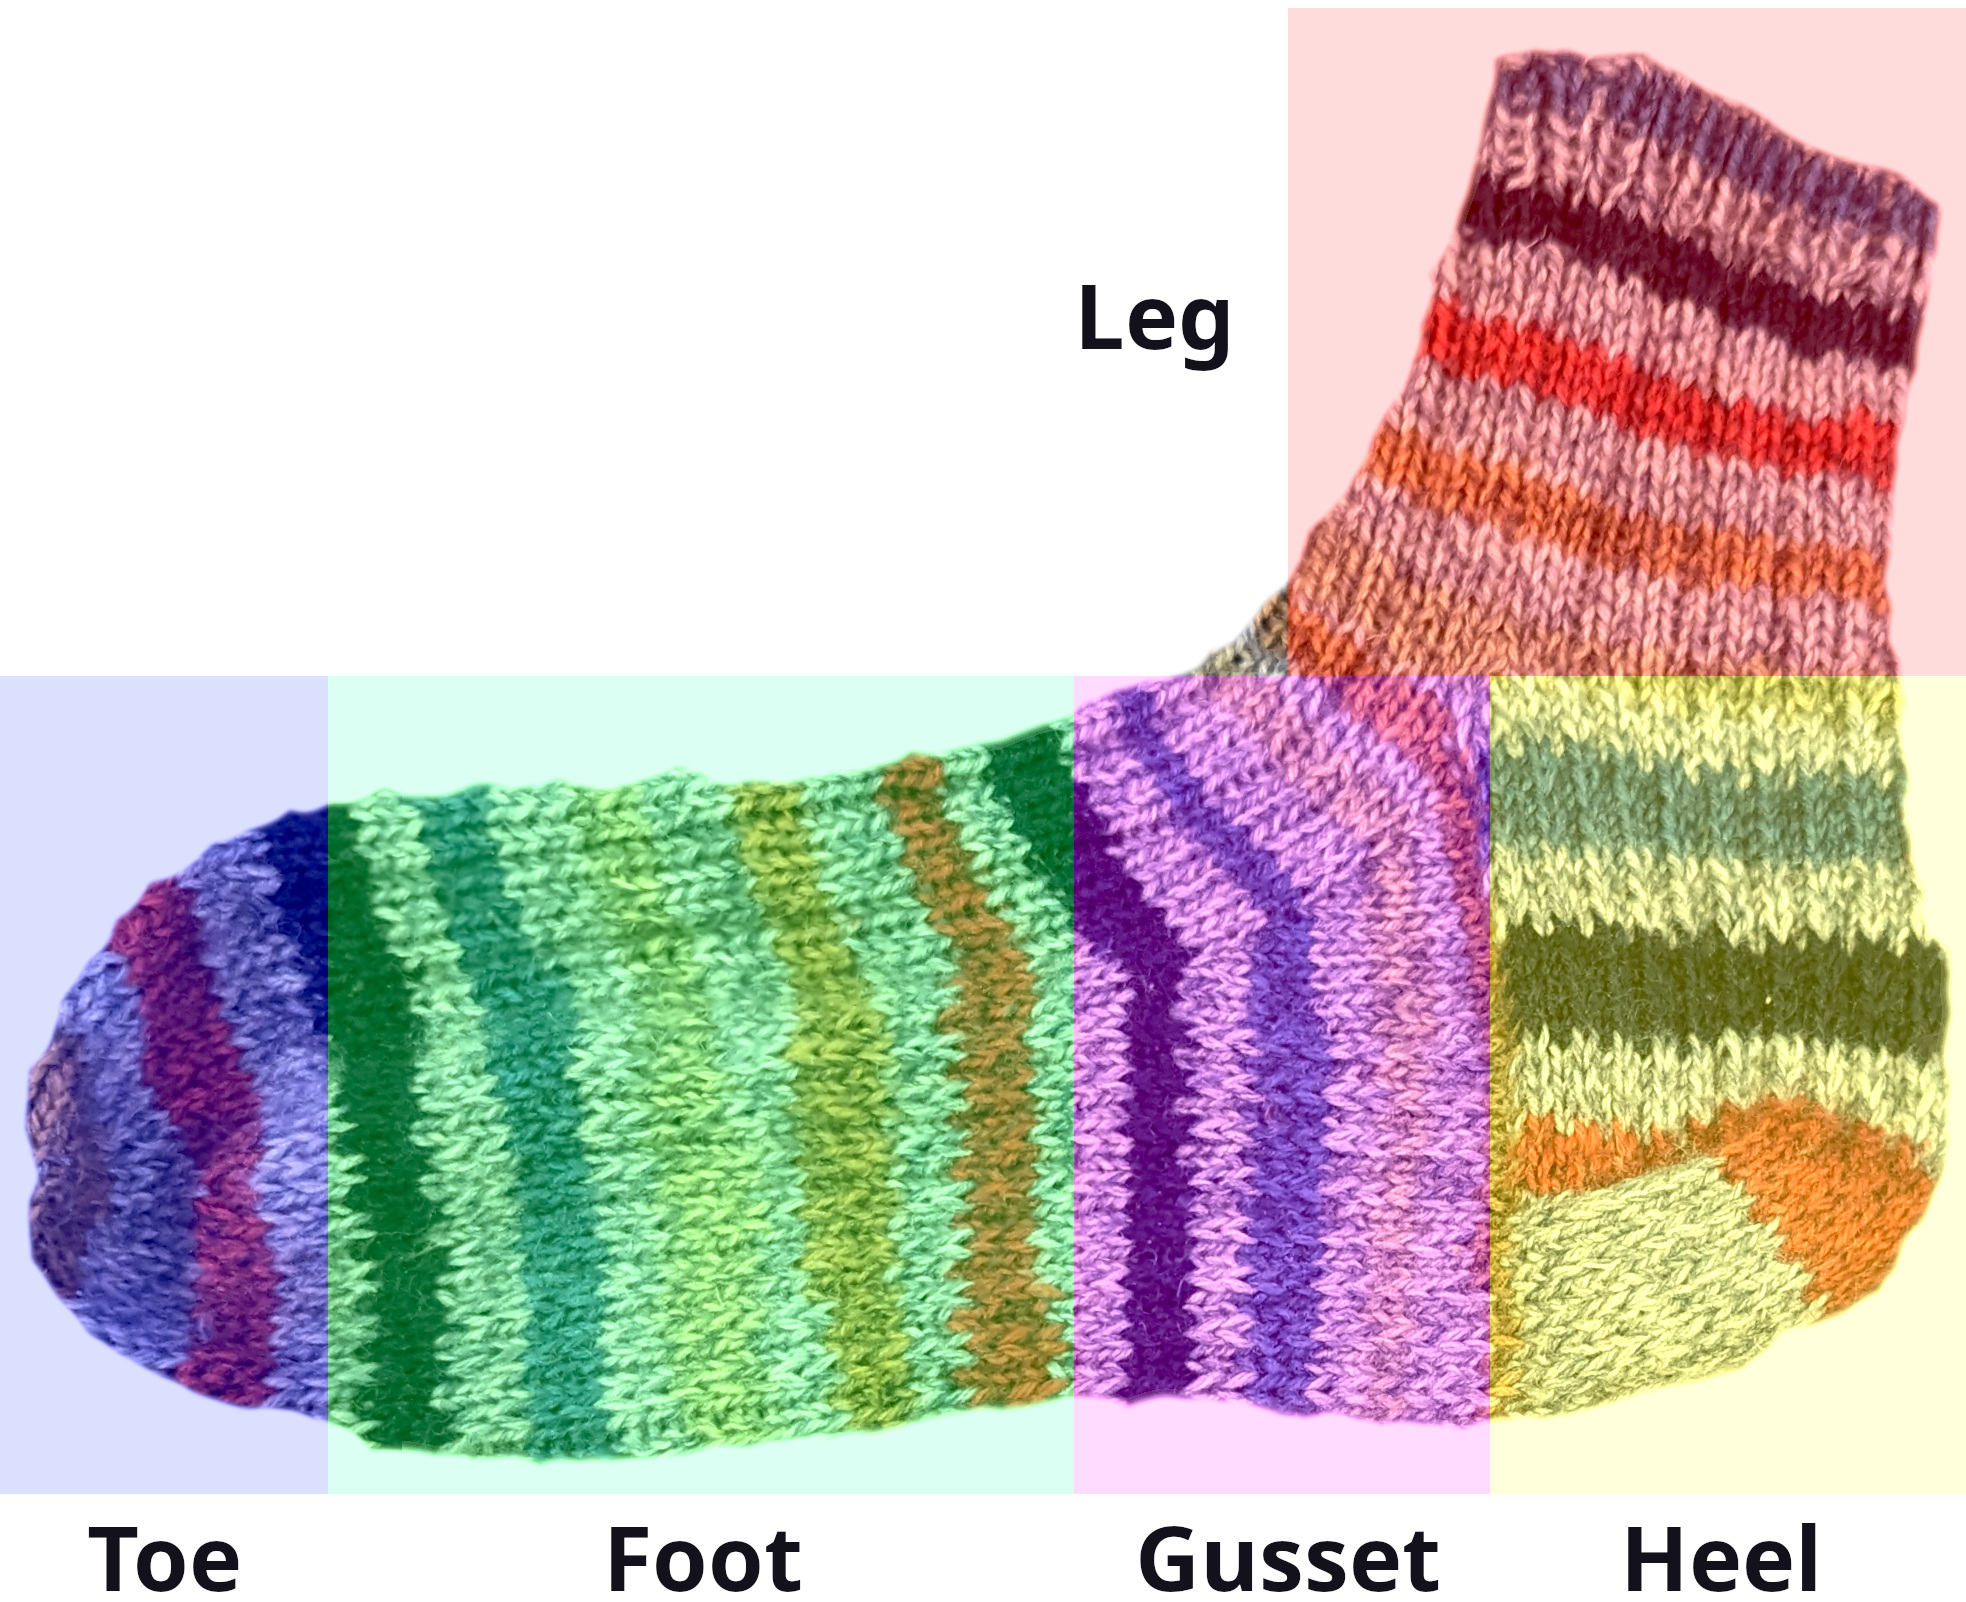
In the image you can see a colour-coded breakdown of these parts, in the order in which they’re completed:
- Blue - Cast-on and toe
- Green - Main body of the foot
- Purple - Gusset, which provides the shaping to accommodate the transition through the ankle
- Yellow - Heel
- Red - Leg
Sizing/measurement
As I mentioned earlier, one of the huge advantages of knitting socks toe-up is that it’s possible to try them on as you complete them to verify the fit (assuming you have access to the requisite foot). However, that doesn’t free us from the need to size the piece correctly, if only because we avoid extra re-work if we get the size right at the outset.
Of course, step one in completing any fitted garment is the creation of a gauge swatch. As tempting as it is, don’t skip this step! An accurate measurement of stitch gauge, in particular, is important for socks, as that determines how snug and comfortable the socks are around the foot.
When measuring the foot, you’ll need both the desired circumference as well as the length. With respect to circumference, measure around the ball of the foot at the widest point before the toes. You’ll then want to subtract 0.5-1.0cm to allow for stretch in the fabric1.
When measuring the length of the foot, you’ll need to capture a few things, as depicted below:
I typically reference all measurements starting from the toe. Since we can knit to the target length, row gauge matters a lot less.
Construction
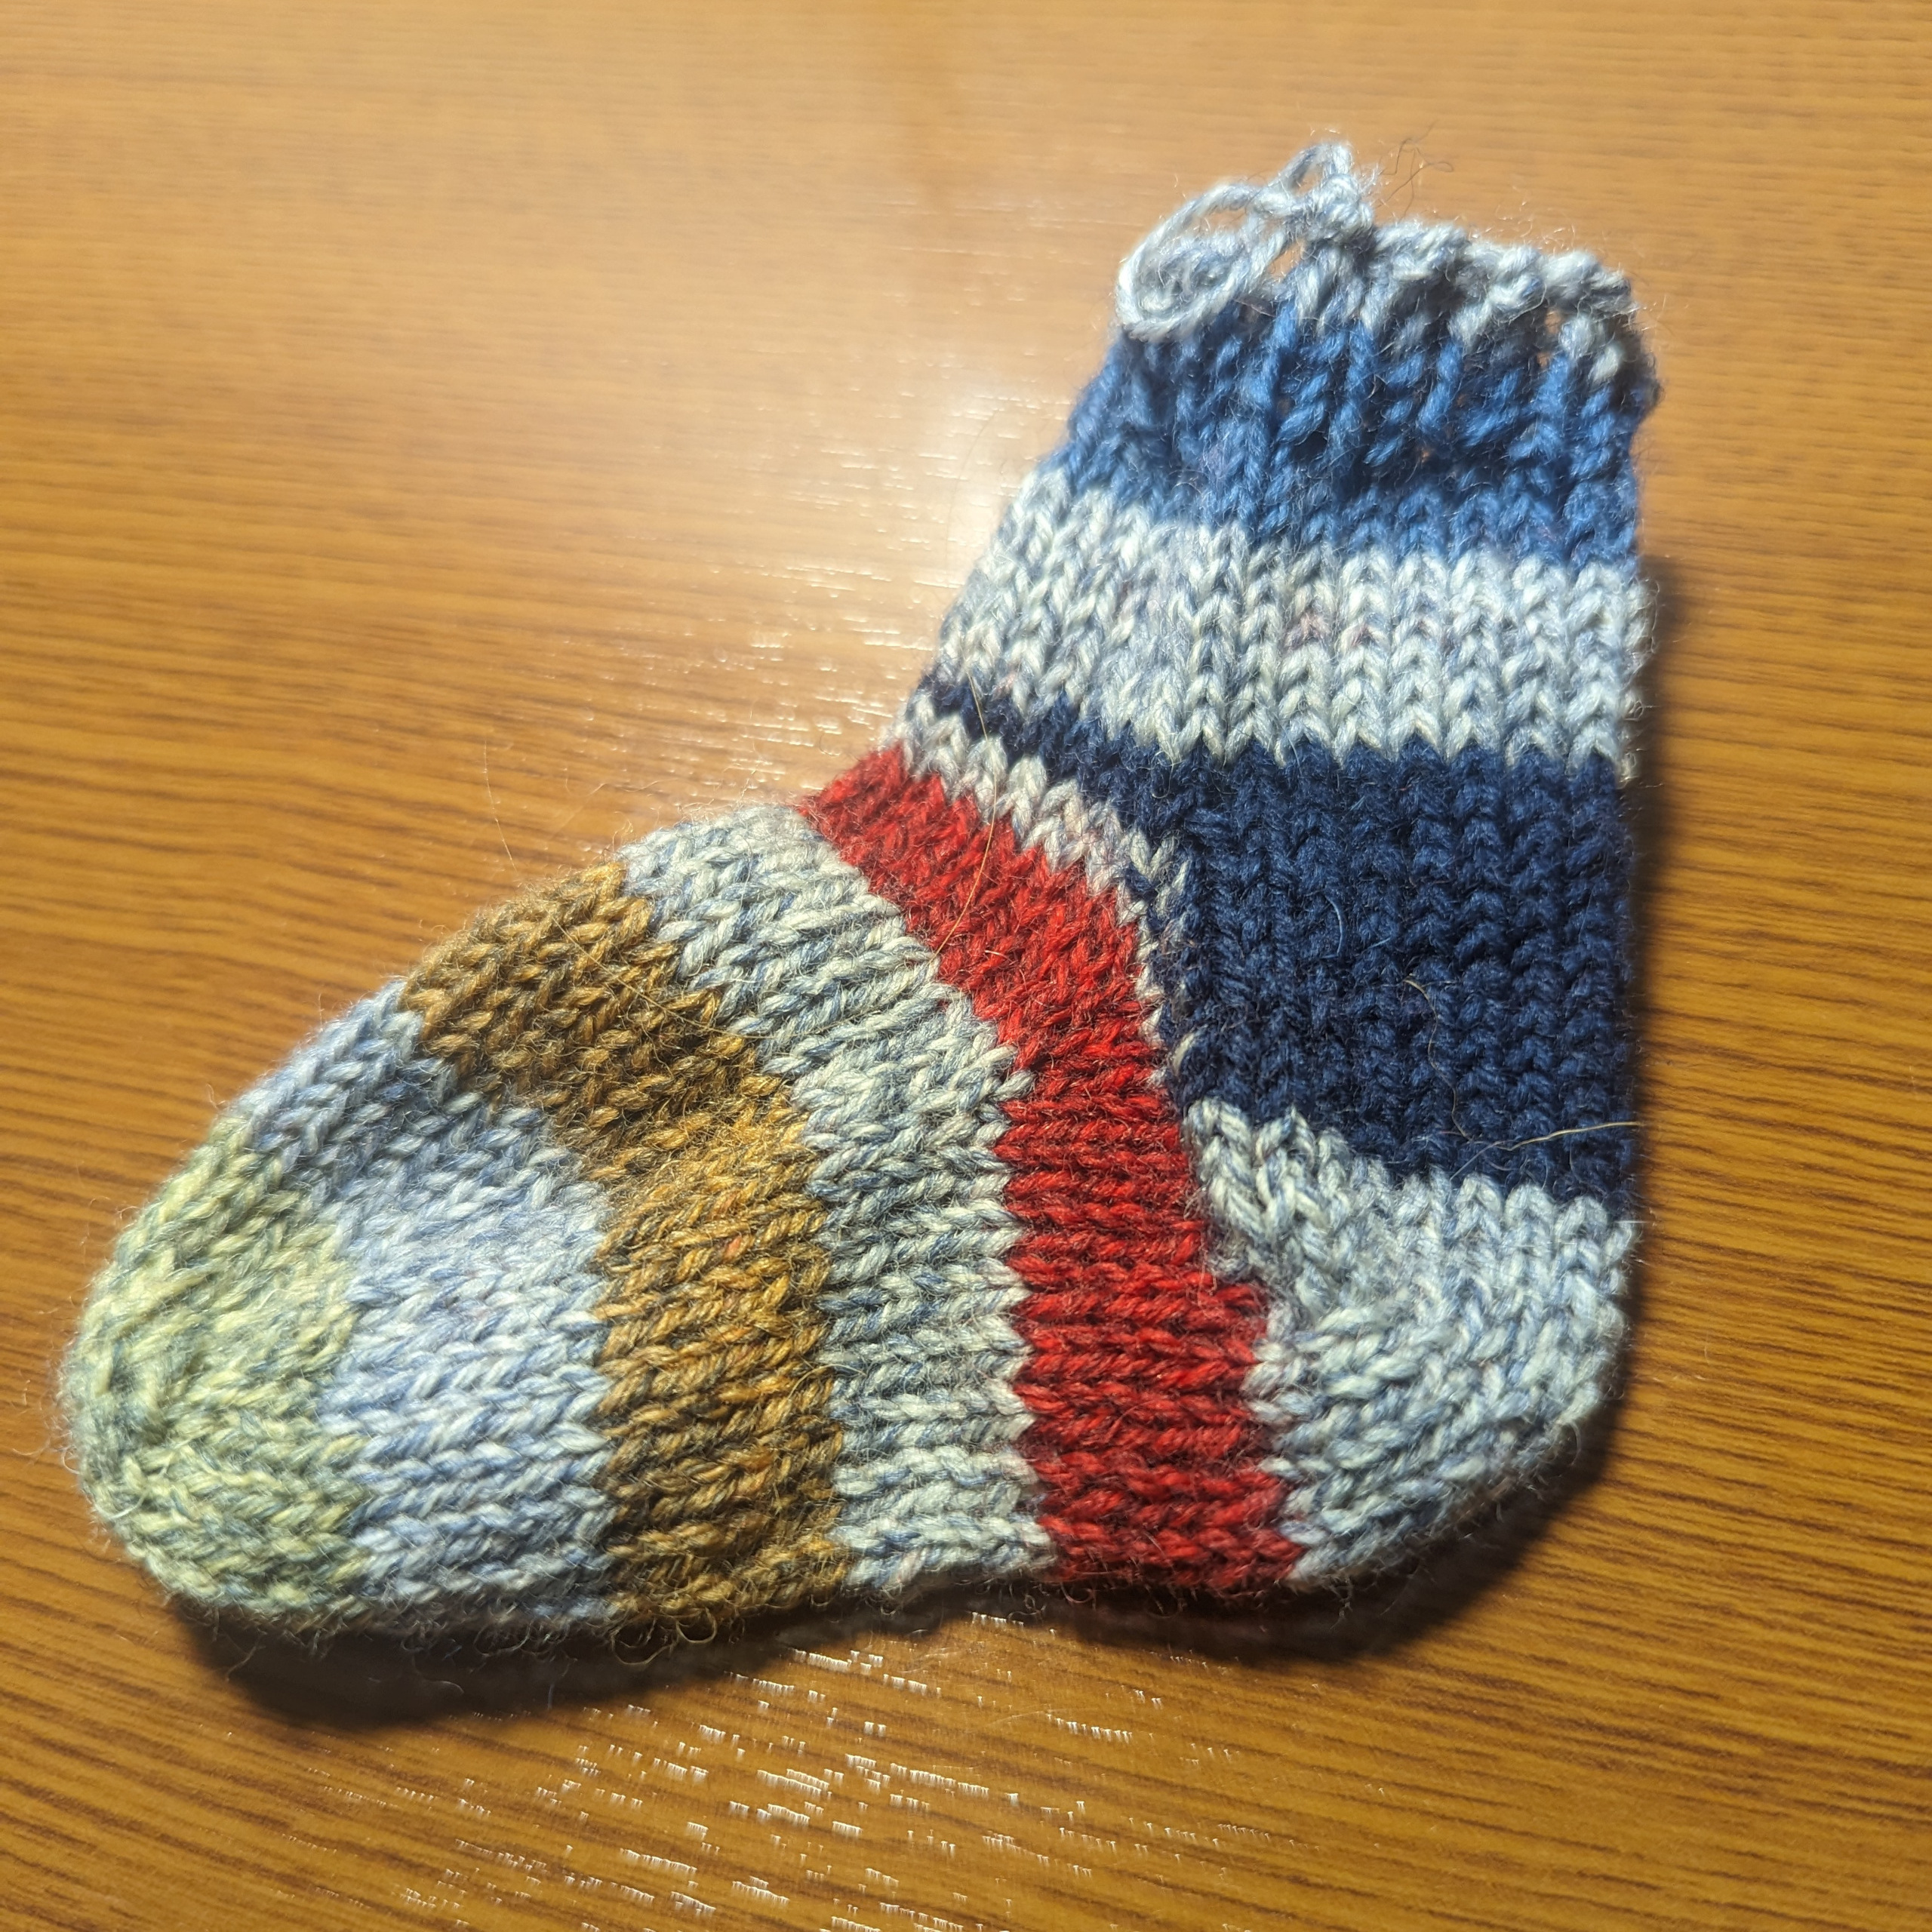
My goal in creating these lessons is to create a set of instructions that teach the fundamentals of sock knitting. To illustrate those fundamentals, I created a single tiny sock and took photos of the process.
If you want to follow along, I’ll include the specifics of this particular construction. While you won’t get a usable sock (unless you’re a 3 month old infant), it has the advantage of knitting up quickly2 and allowing you to practice the concepts.
This approach also discourage learners from learning by rote memorization, since in order to actually knit an adult-sized sock you’ll need to take these principles and extrapolate them.
Materials
For this toy sock, you don’t need much beyond some scrap yarn and a set of double-pointed needles.
The sample sock for these lessons was made using some extra Patons Kroy Socks yarn I had laying around. This yarn is a heavy fingering weight and, in this example, is knitted up on US size 3/3.25 mm needles.
If you choose to work these up on circular needles, you’ll also want a set of stitch markers.
Example project sizing
These are rough but illustrate the key measurements for this toy sock:
- 16 stitch cast-on
- 32 stitch foot diameter
- 6 cm toe to gusset
- 8.5 cm toe to heel flap
- 11 cm total length
But, honestly, the specifics don’t matter that much. The goal is for the sock to be just big enough to practice each step enough to build some fluency.
Cast-on
In these lessons we’ll be creating a basic wedge toe, which is made by casting on some smaller set of stitches and increasing to the target circumference.
The cast-on is without a doubt the most difficult part of making a toe-up sock. There are quite a few different techniques out there, but I’m personally a big fan of Judy’s Magic Cast-on In my experience it’s the least fiddly cast-on method and produces a perfect, seamless toe.
I typically cast on half the number of stitches in the target circumference, so in this construction we’ll be casting on 16 stitches and then increasing to 32.
You’ll also notice that, in these lessons, I’m working across 5 DPNs. As you’ll see later, this arrangement obviates the need for stitch markers. If you prefer to work on fewer DPNs or are a fan of Magic Loop, feel free to do so, just make sure to place stitch markers to mark the top and bottom halves of the sock.
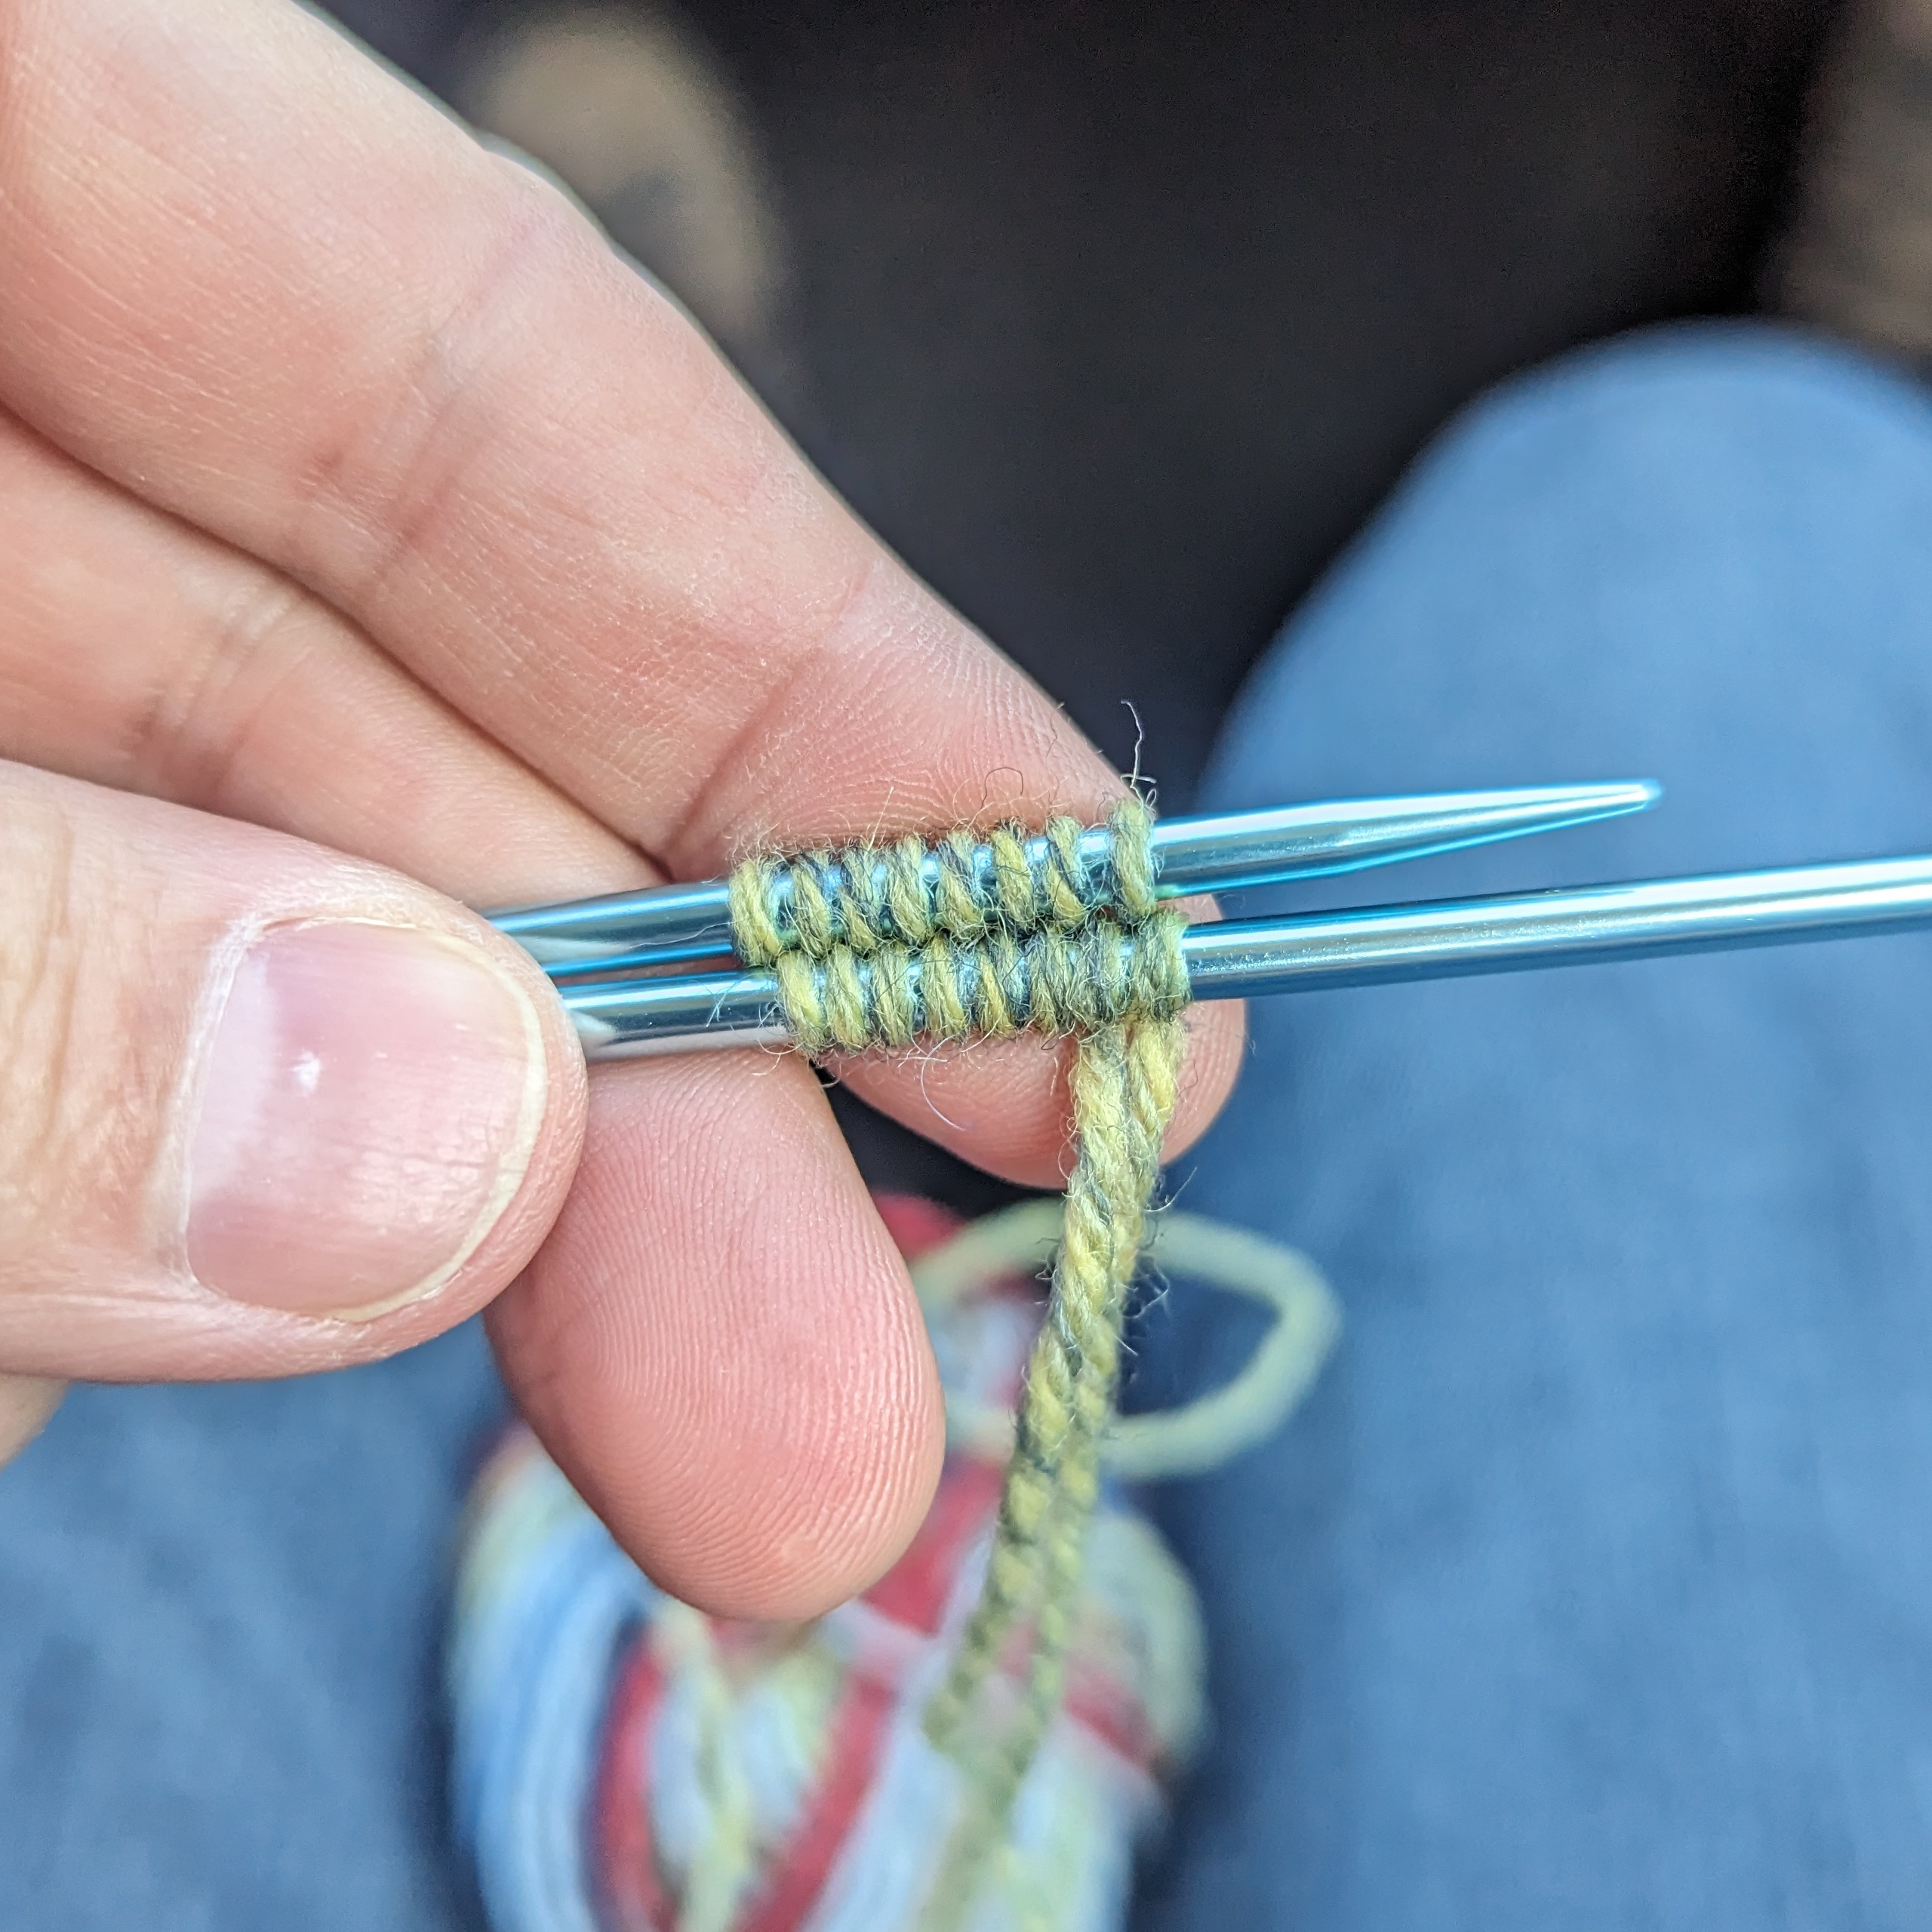
Toe increases

After casting on, knit one full round to establish a base of stitches. Then begin the increases as shown in the image.
Here you can see we’re creating paired left- and right-leaning increases, which creates the distinctive wedge shape of this toe style.
Foot
Once the toe increases are completed you can now proceed with knitting up the main body of the foot. In our example sock we’re not knitting up any fancy patterns, so you’d be knitting up straight stockinette. However, sock patterns often include some sort of decorative fabric on the top of the foot, so this is a good opportunity to get creative and bust out that stitch dictionary! Just be careful to consider the stitch gauge and stretchiness of the fabric, as certain materials, such as cables, can knit up tight and stiff, and so can have a significant impact on sizing.
As per the length measurement diagram earlier, you’ll be knitting until you reach the desired toe-to-gusset length.
Gusset increases
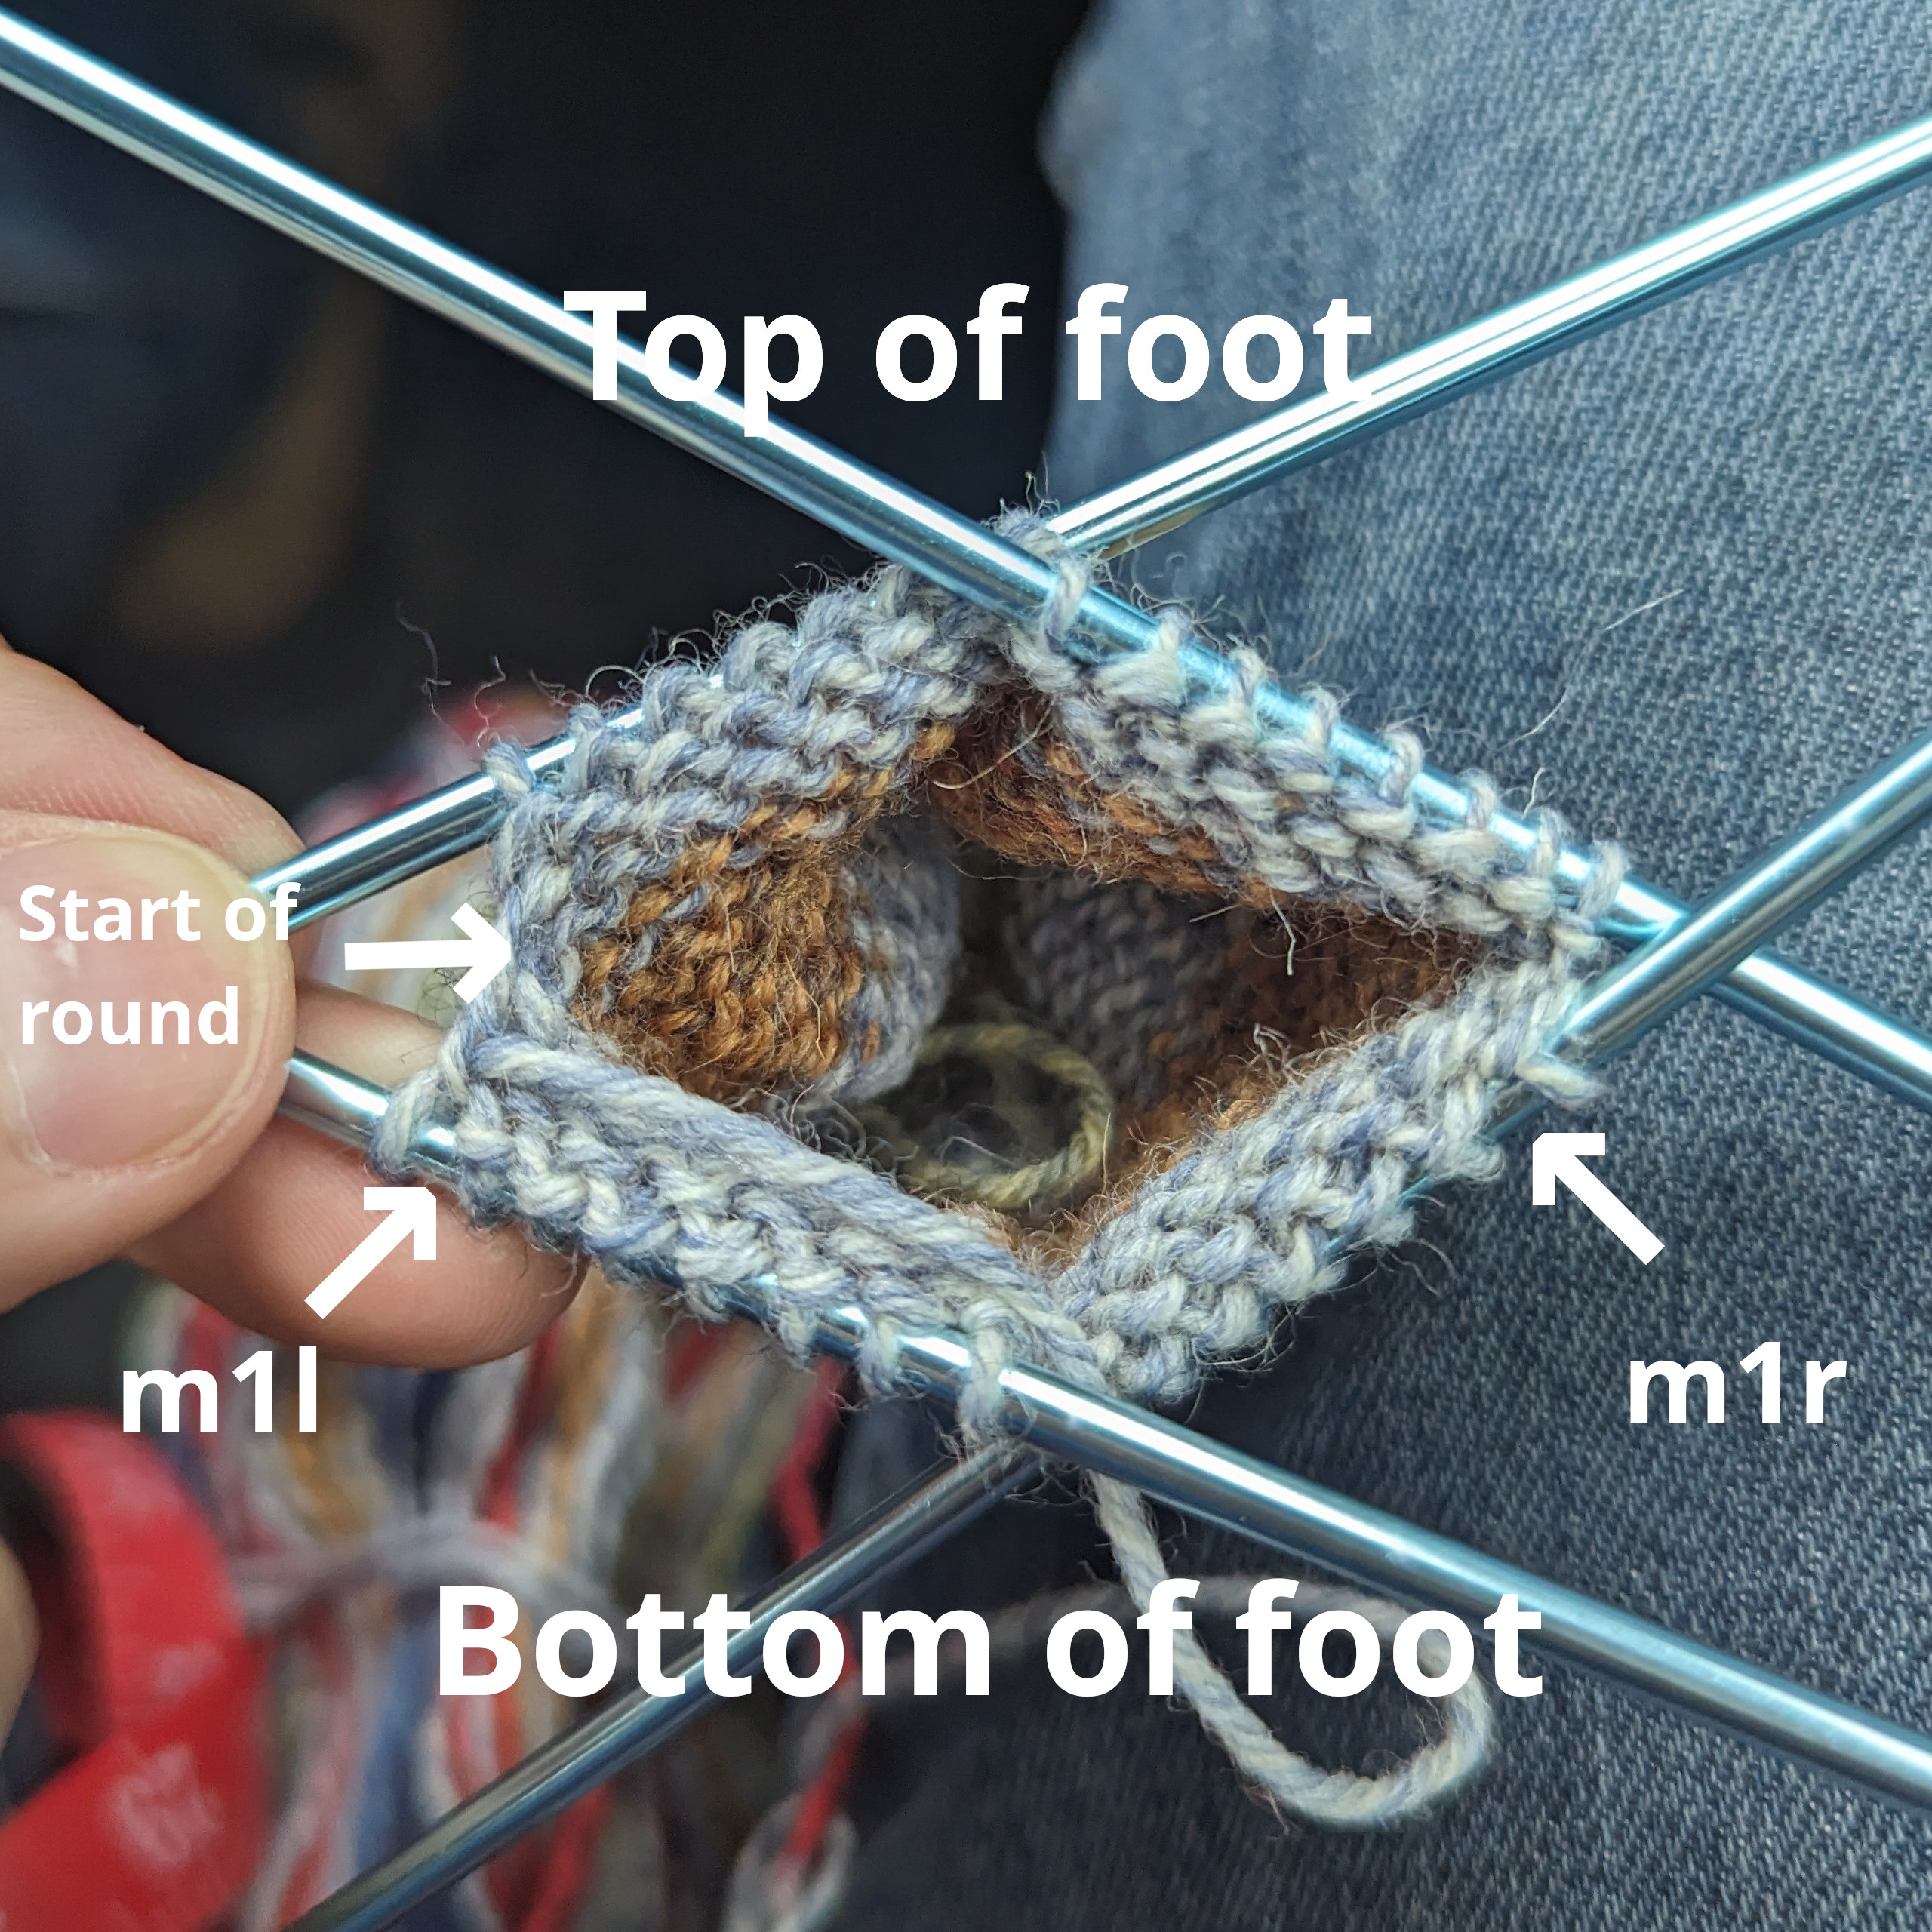
The gusset is the portion of the sock that widens to accommodate for the rise of the arch and the transition through the ankle to the leg. This shaping involves creating two wedge-shaped sets of increases on each side of the foot so that the top of the foot rises away from the bottom.
You’ll notice I’m positioning the gusset increases at the ends of needles 3 and 4, comprising the bottom stitches of the sock. Arranging the increases this way ensures that the increases always occur in the correct locations.
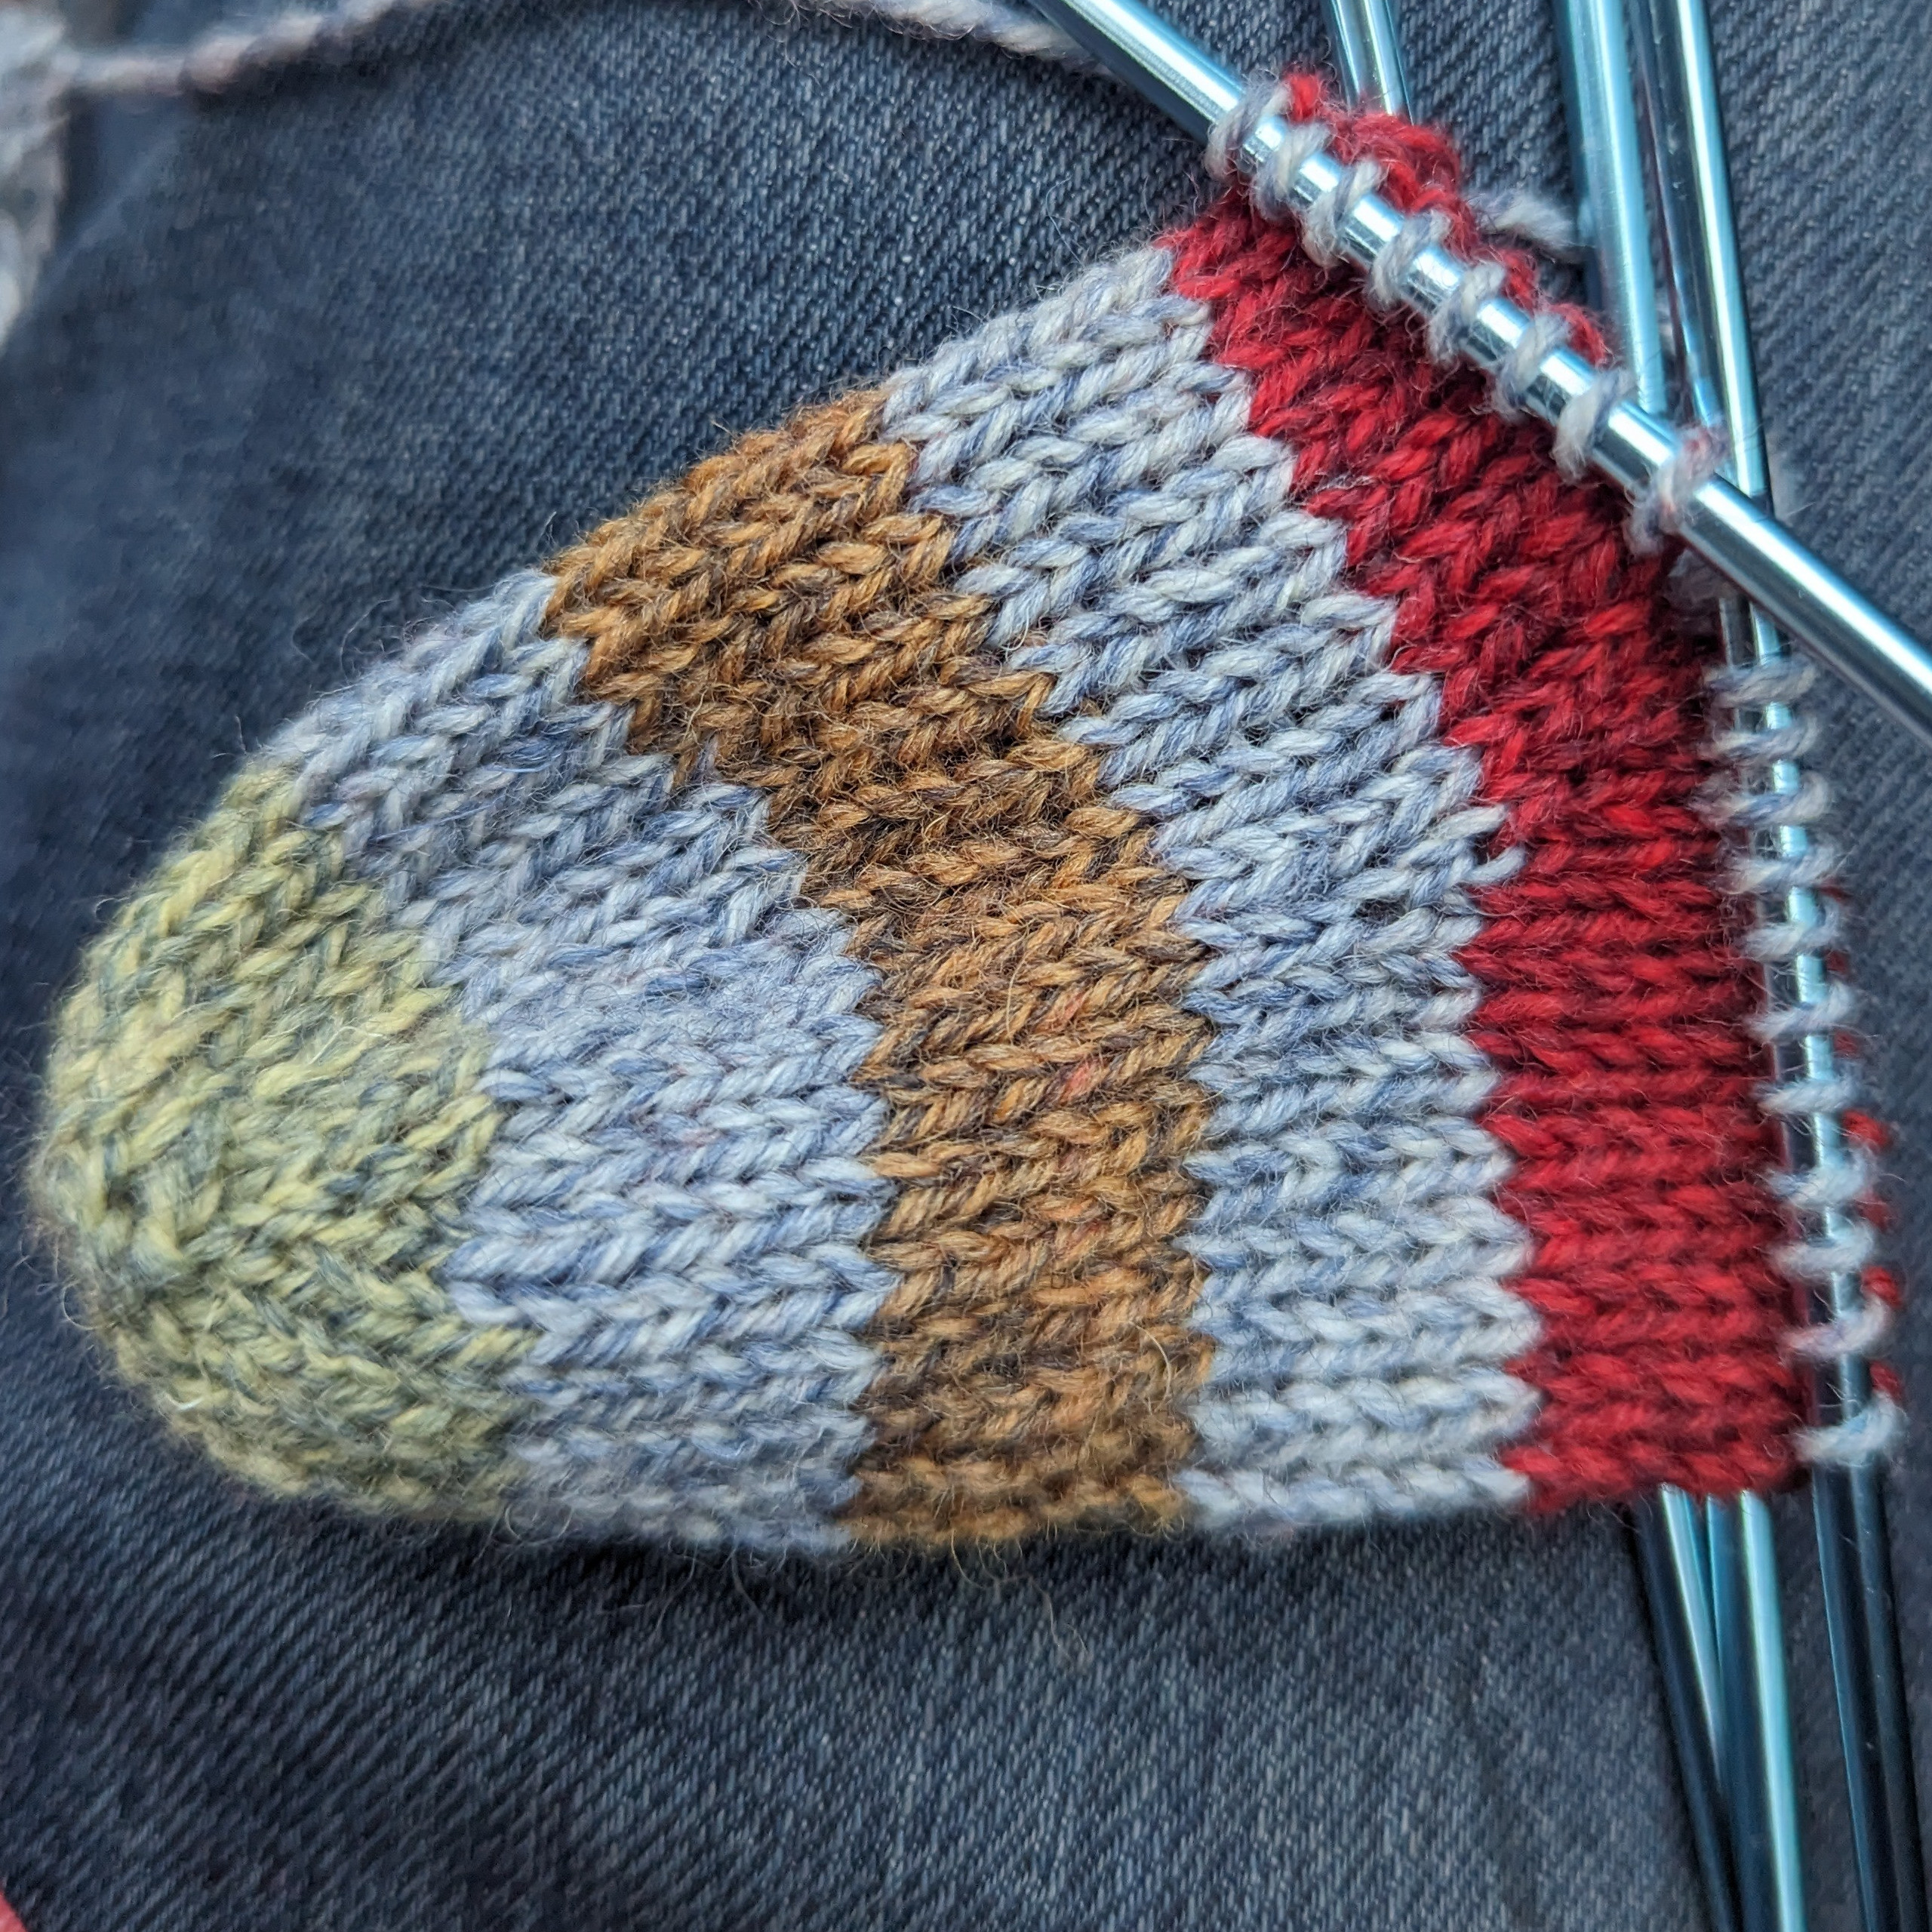
If you’re not using DPNs, make sure to place a stitch marker to ensure the increases occur in the right place.
The final result should be paired wedges on each side of the foot, as depicted in this photo and in the colour coded image presented earlier in these lessons.
Heel flap
There are many different methods for creating sock heels with various pros and cons. For these lessons I’ll be illustrating the creation of a classic square heel, also known as a Dutch heel or a flap heel. Why this style? Well, first, it’s the only type of heel I’ve ever learned! But this particular style of heel is also very well suited to toe-up construction, and I also think it’s very easy to understand and visualize.
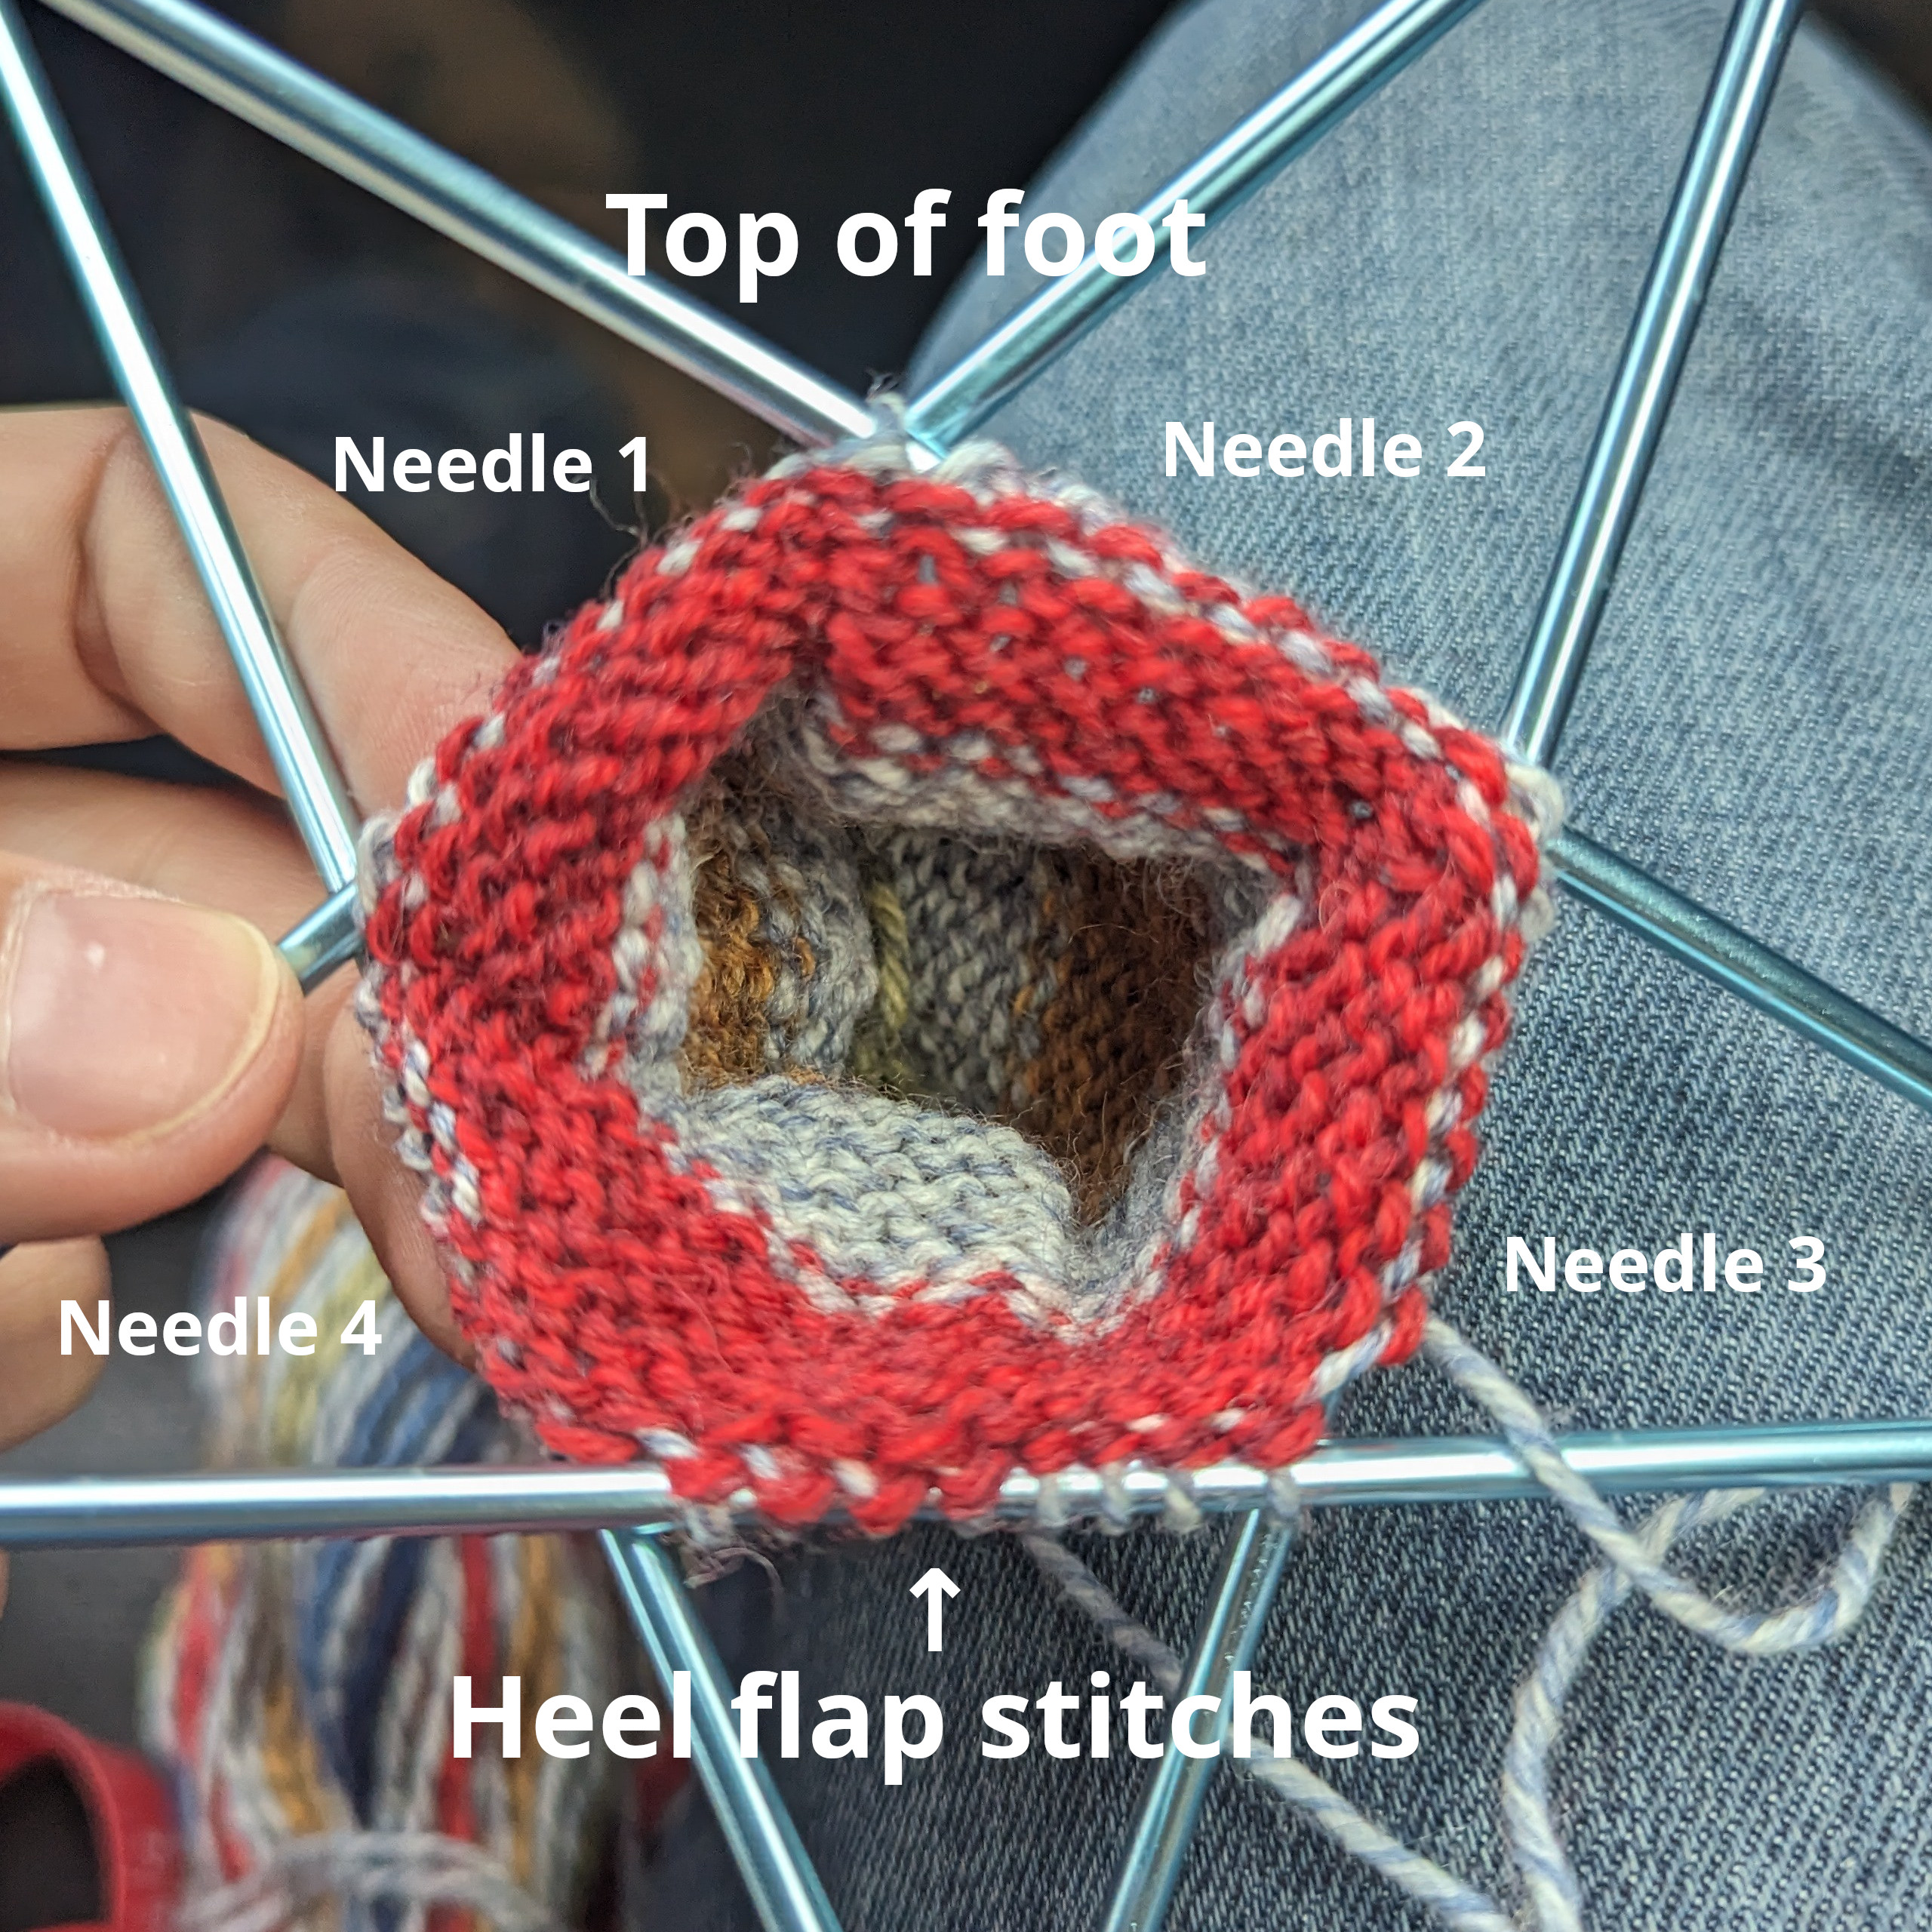
In this style of heel, we knit a flap that extends out from the bottom of the foot, then pick up the stitches on either side of the flap and then knit back and forth while joining in the gusset stitches. You can think of this as knitting the flat base of the heel, then knitting up the sides to form a cup.
To start, we first rearrange the stitches to separate out the stitches for the flap. The flap should be centered on the bottom of the foot, and I typically use about one quarter (25%) of the stitches for the flap. For our sample sock, that means 8 stitches.
Knit around to the start of the flap, then construct the flap by knitting short rows until the flap is the desired length.
Critically, at the start of each row, make sure to slip the first stitch knit-wise or purl-wise as necessary to construct a clean selvedge. Finally, end on a purl row.
In our sample construction we end up knitting 8 rows, resulting in four selvedge stitches, which you can see in the included photo.
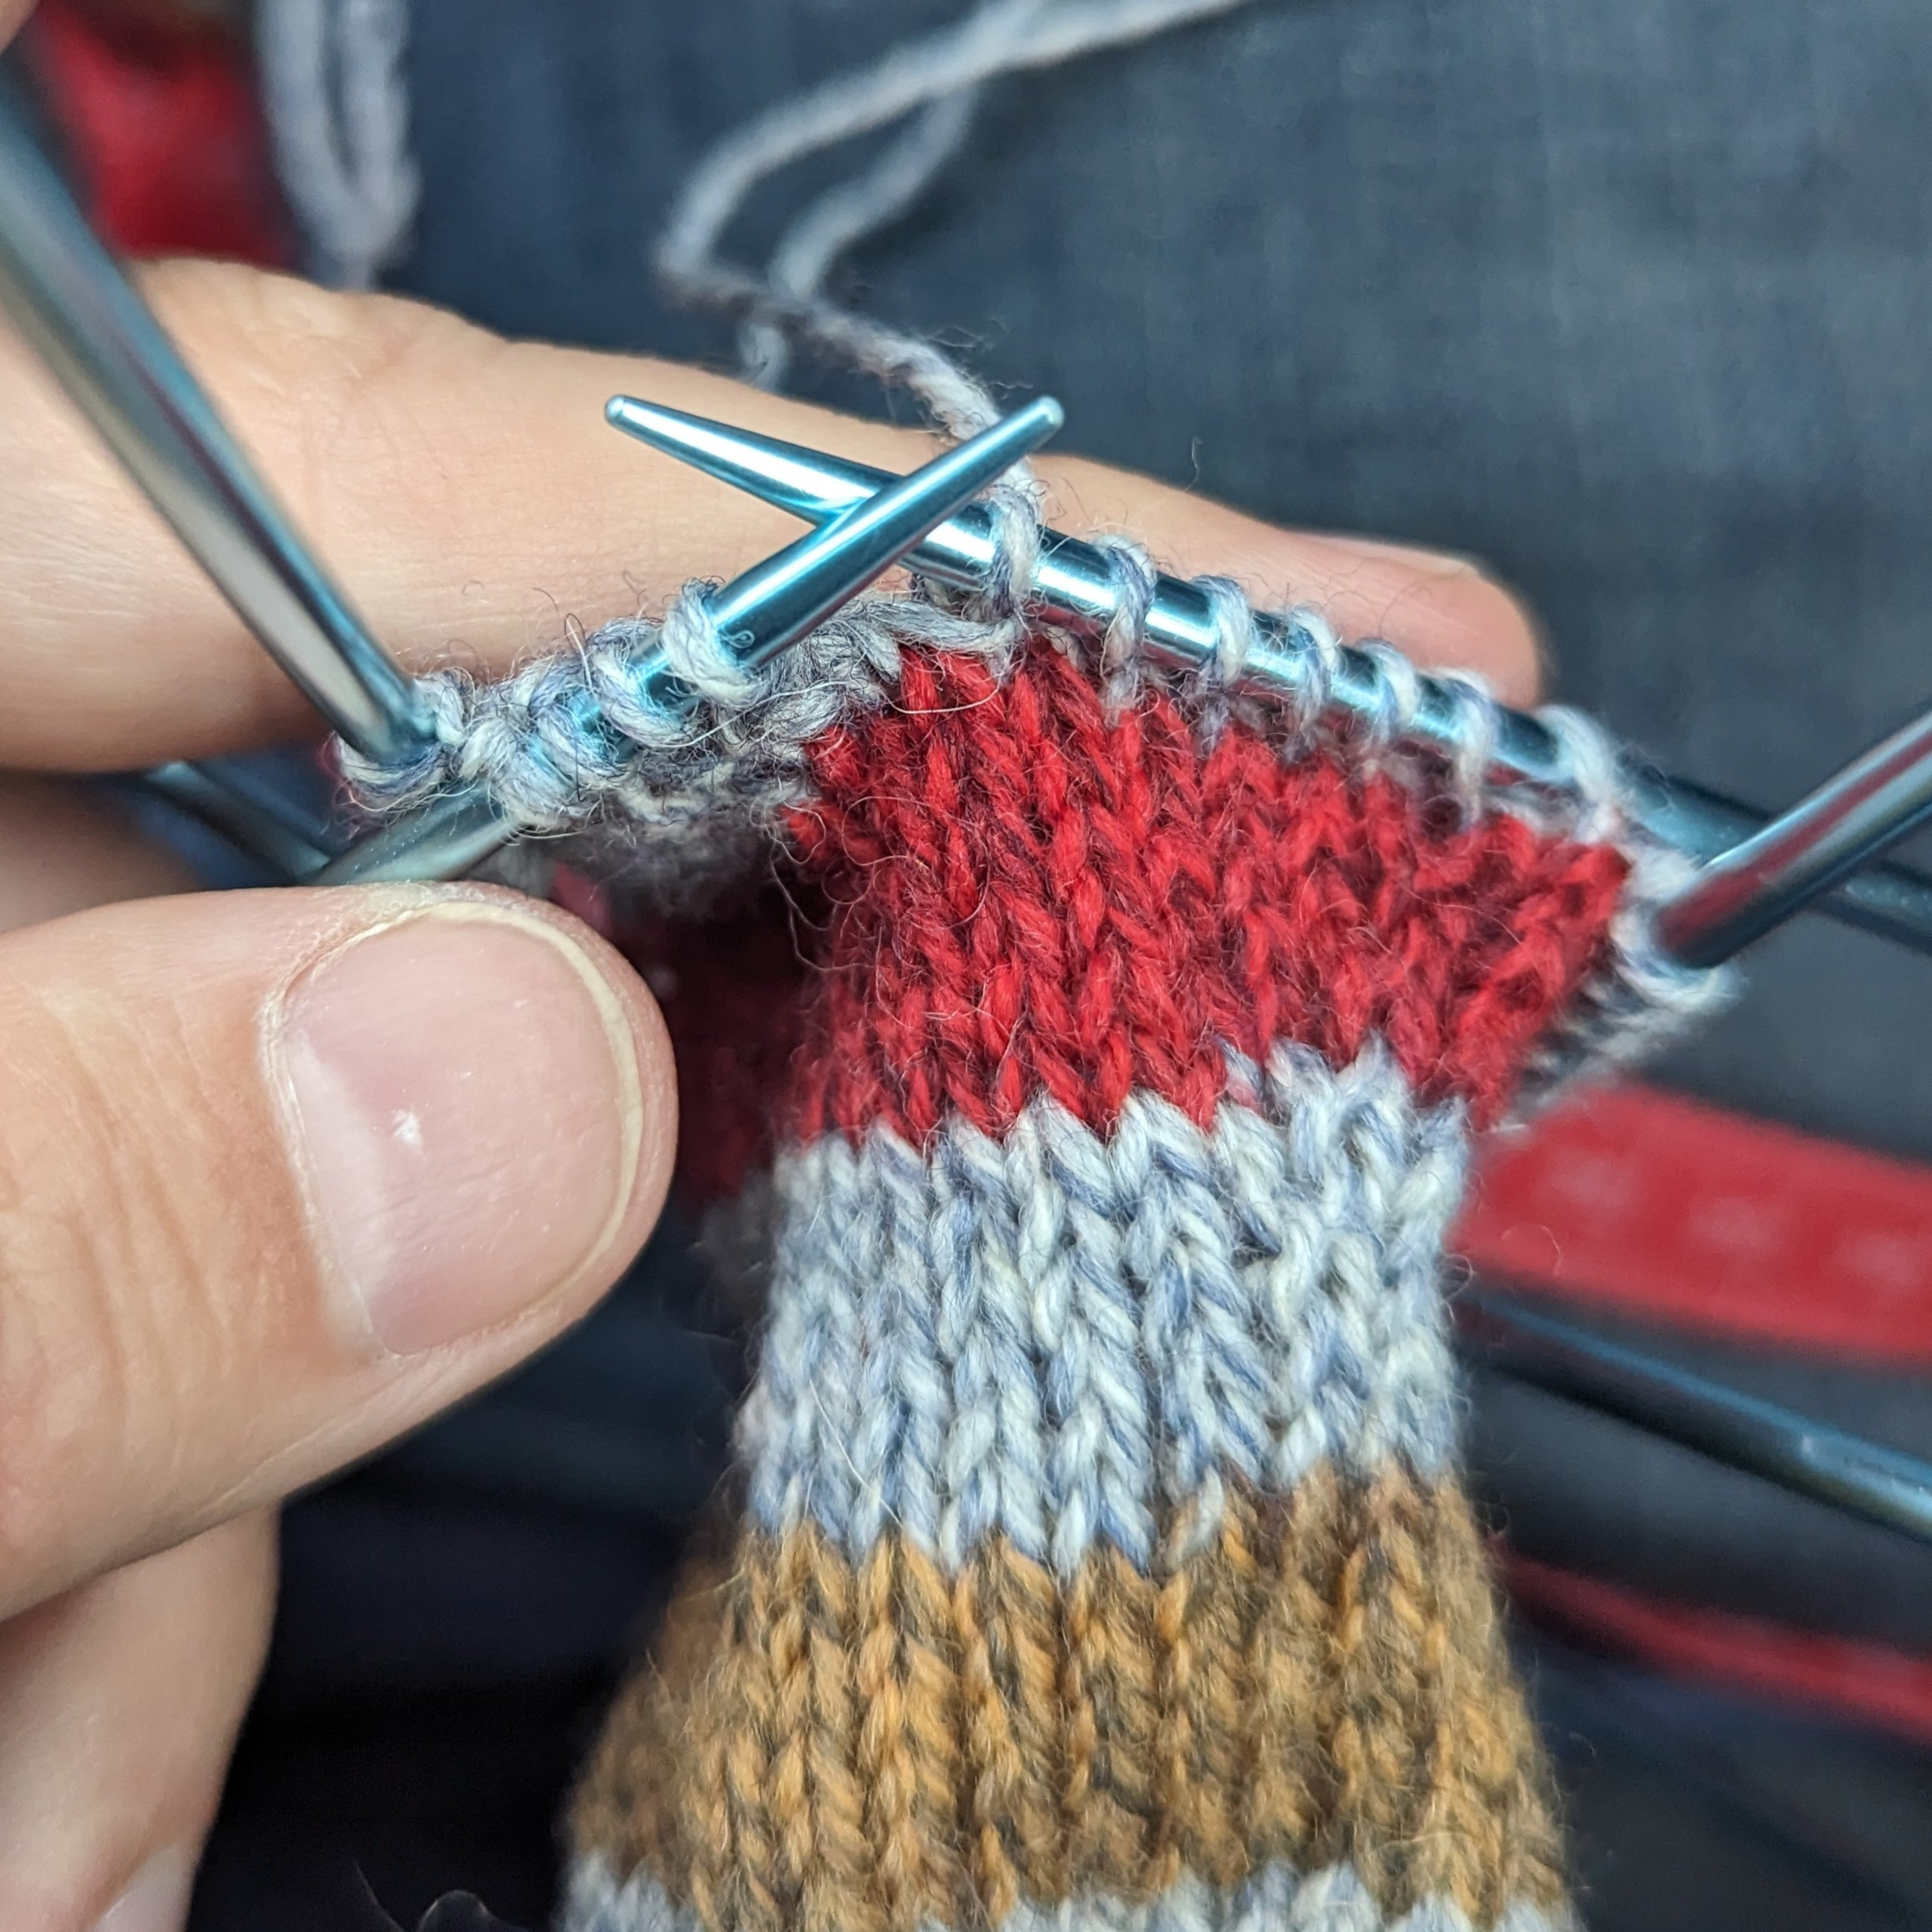
Heel turn and join-up
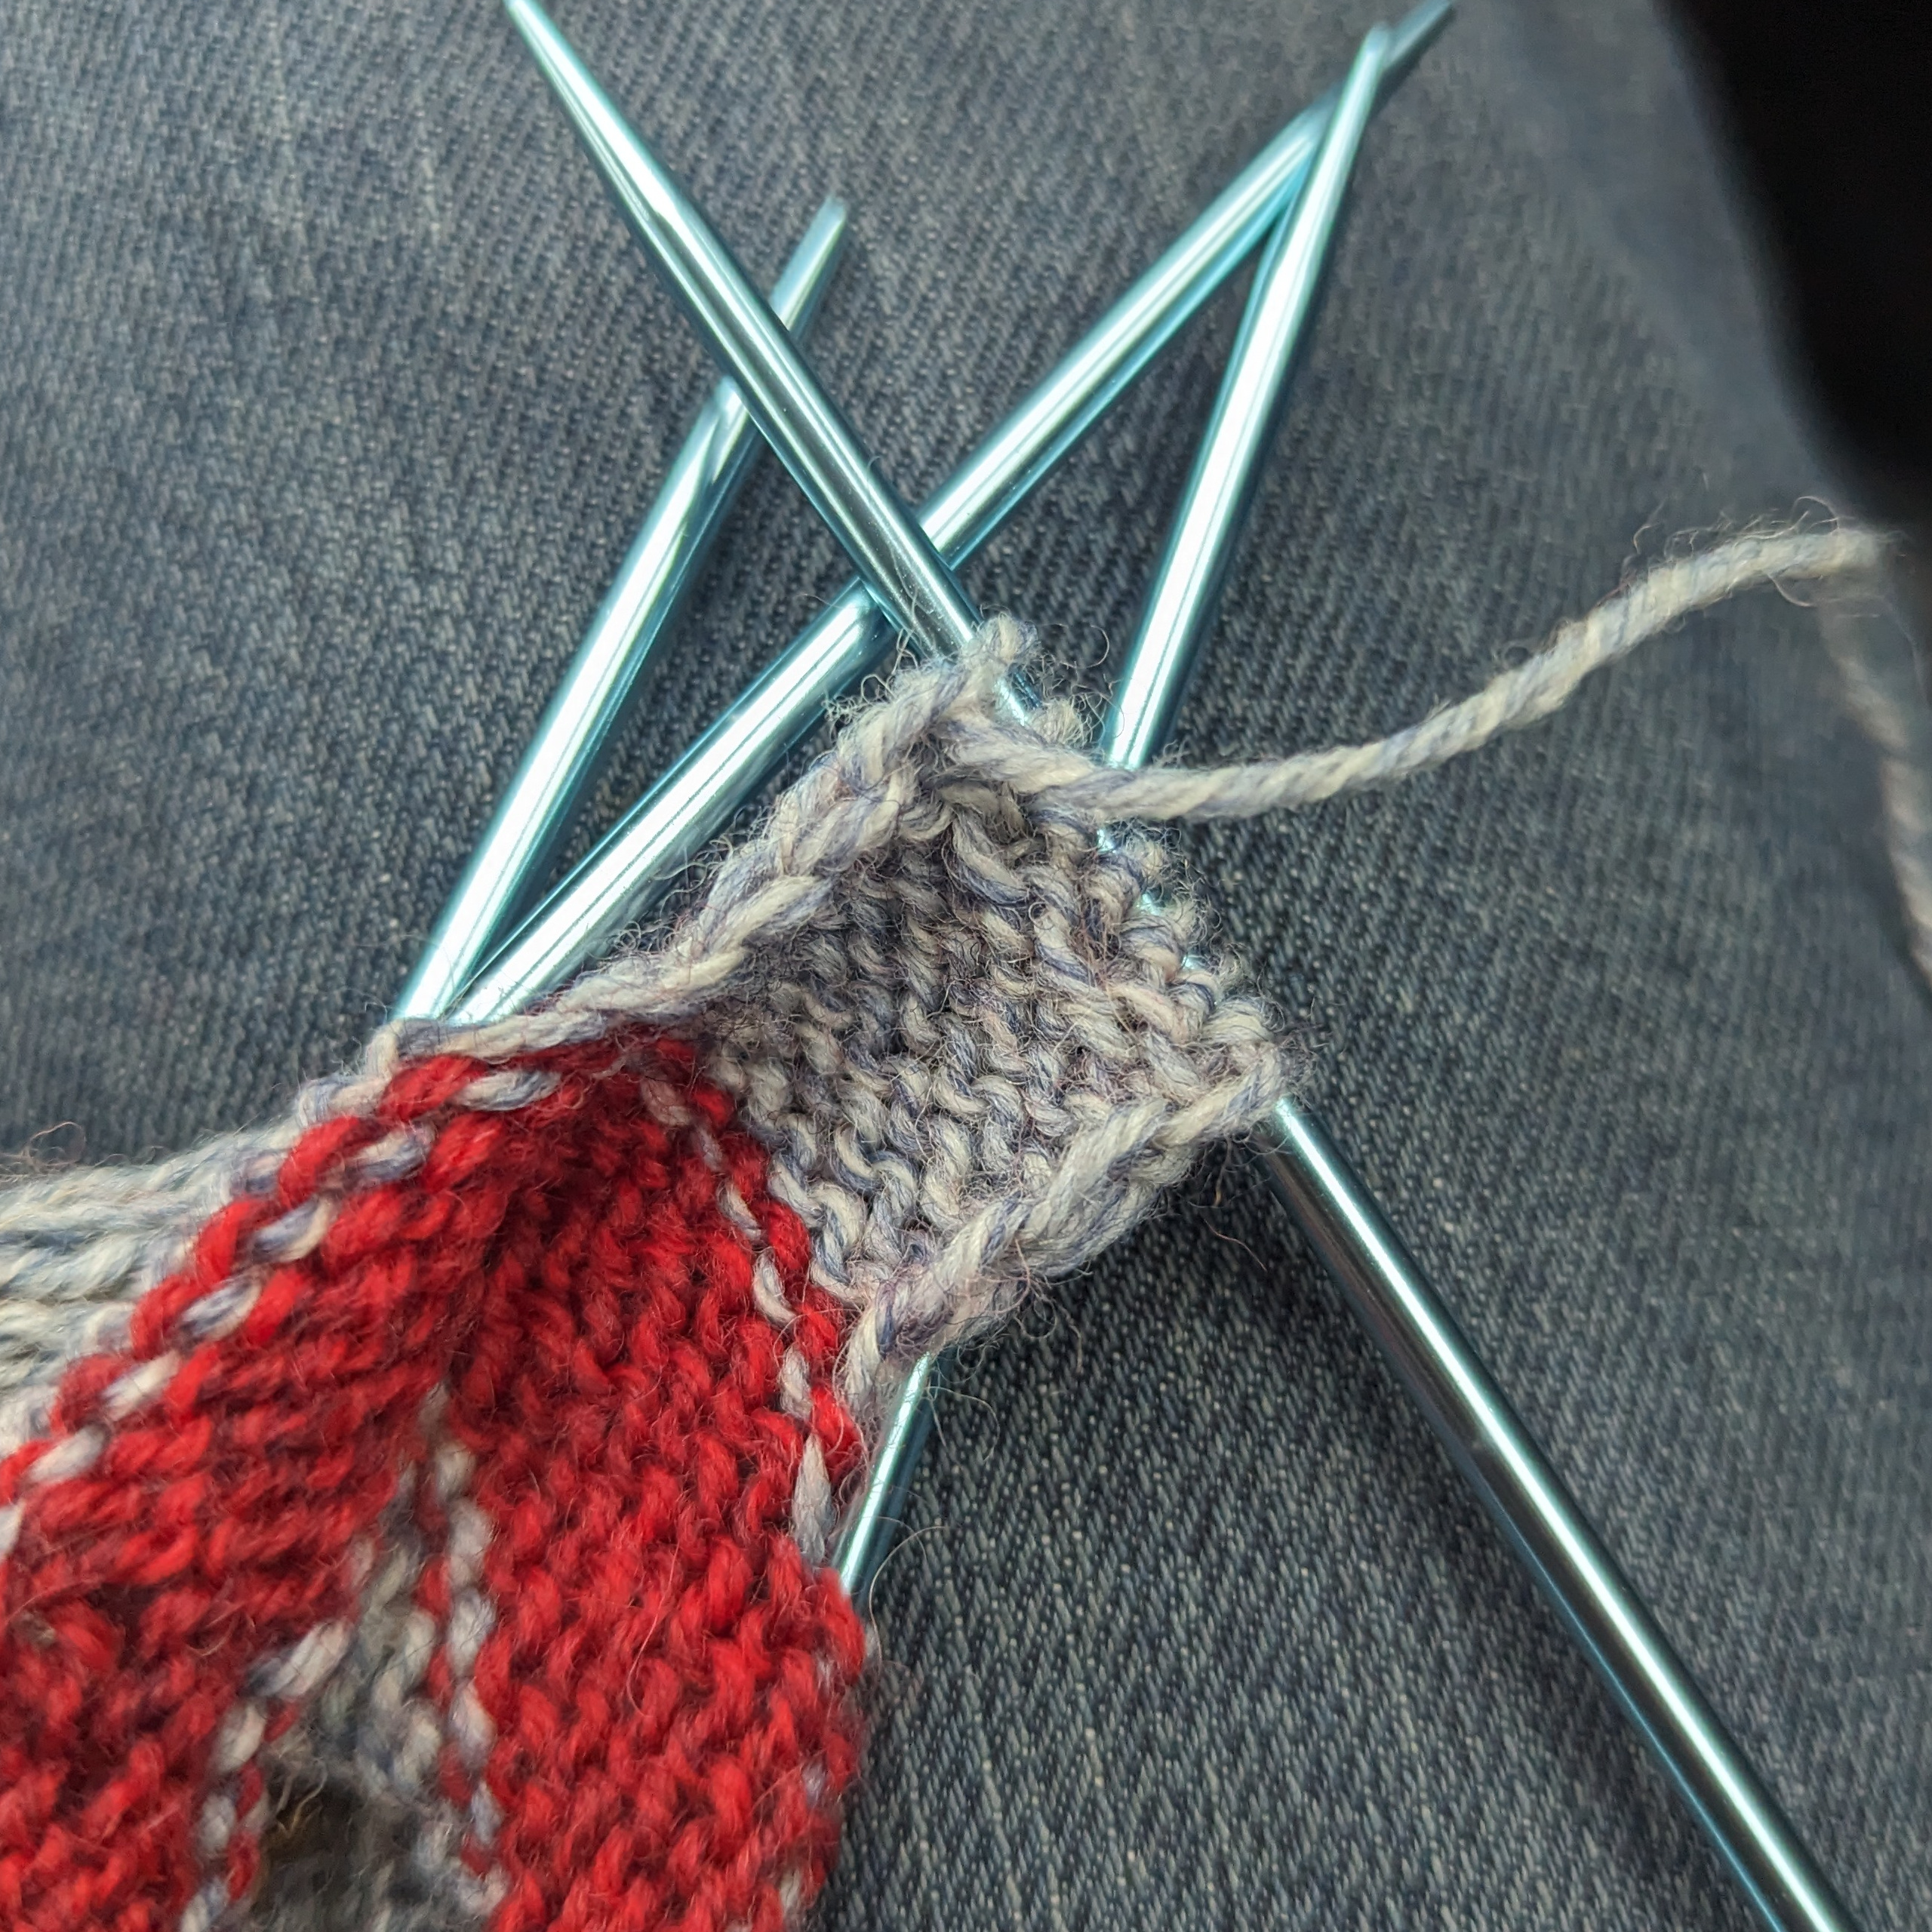
Turning the heel involves picking up the selvedge stitches on either side of the heel flap and then knitting or purling across them. Critically, to ensure a clean seam, it’s important to twist the selvedge stitches which, for this first selvedge, requires purling awkwardly through the backloop.
To make this process less painful, I recommend using a smaller knitting needle to pick up the selvedge stitches. This will make it a lot easier to knit into them.
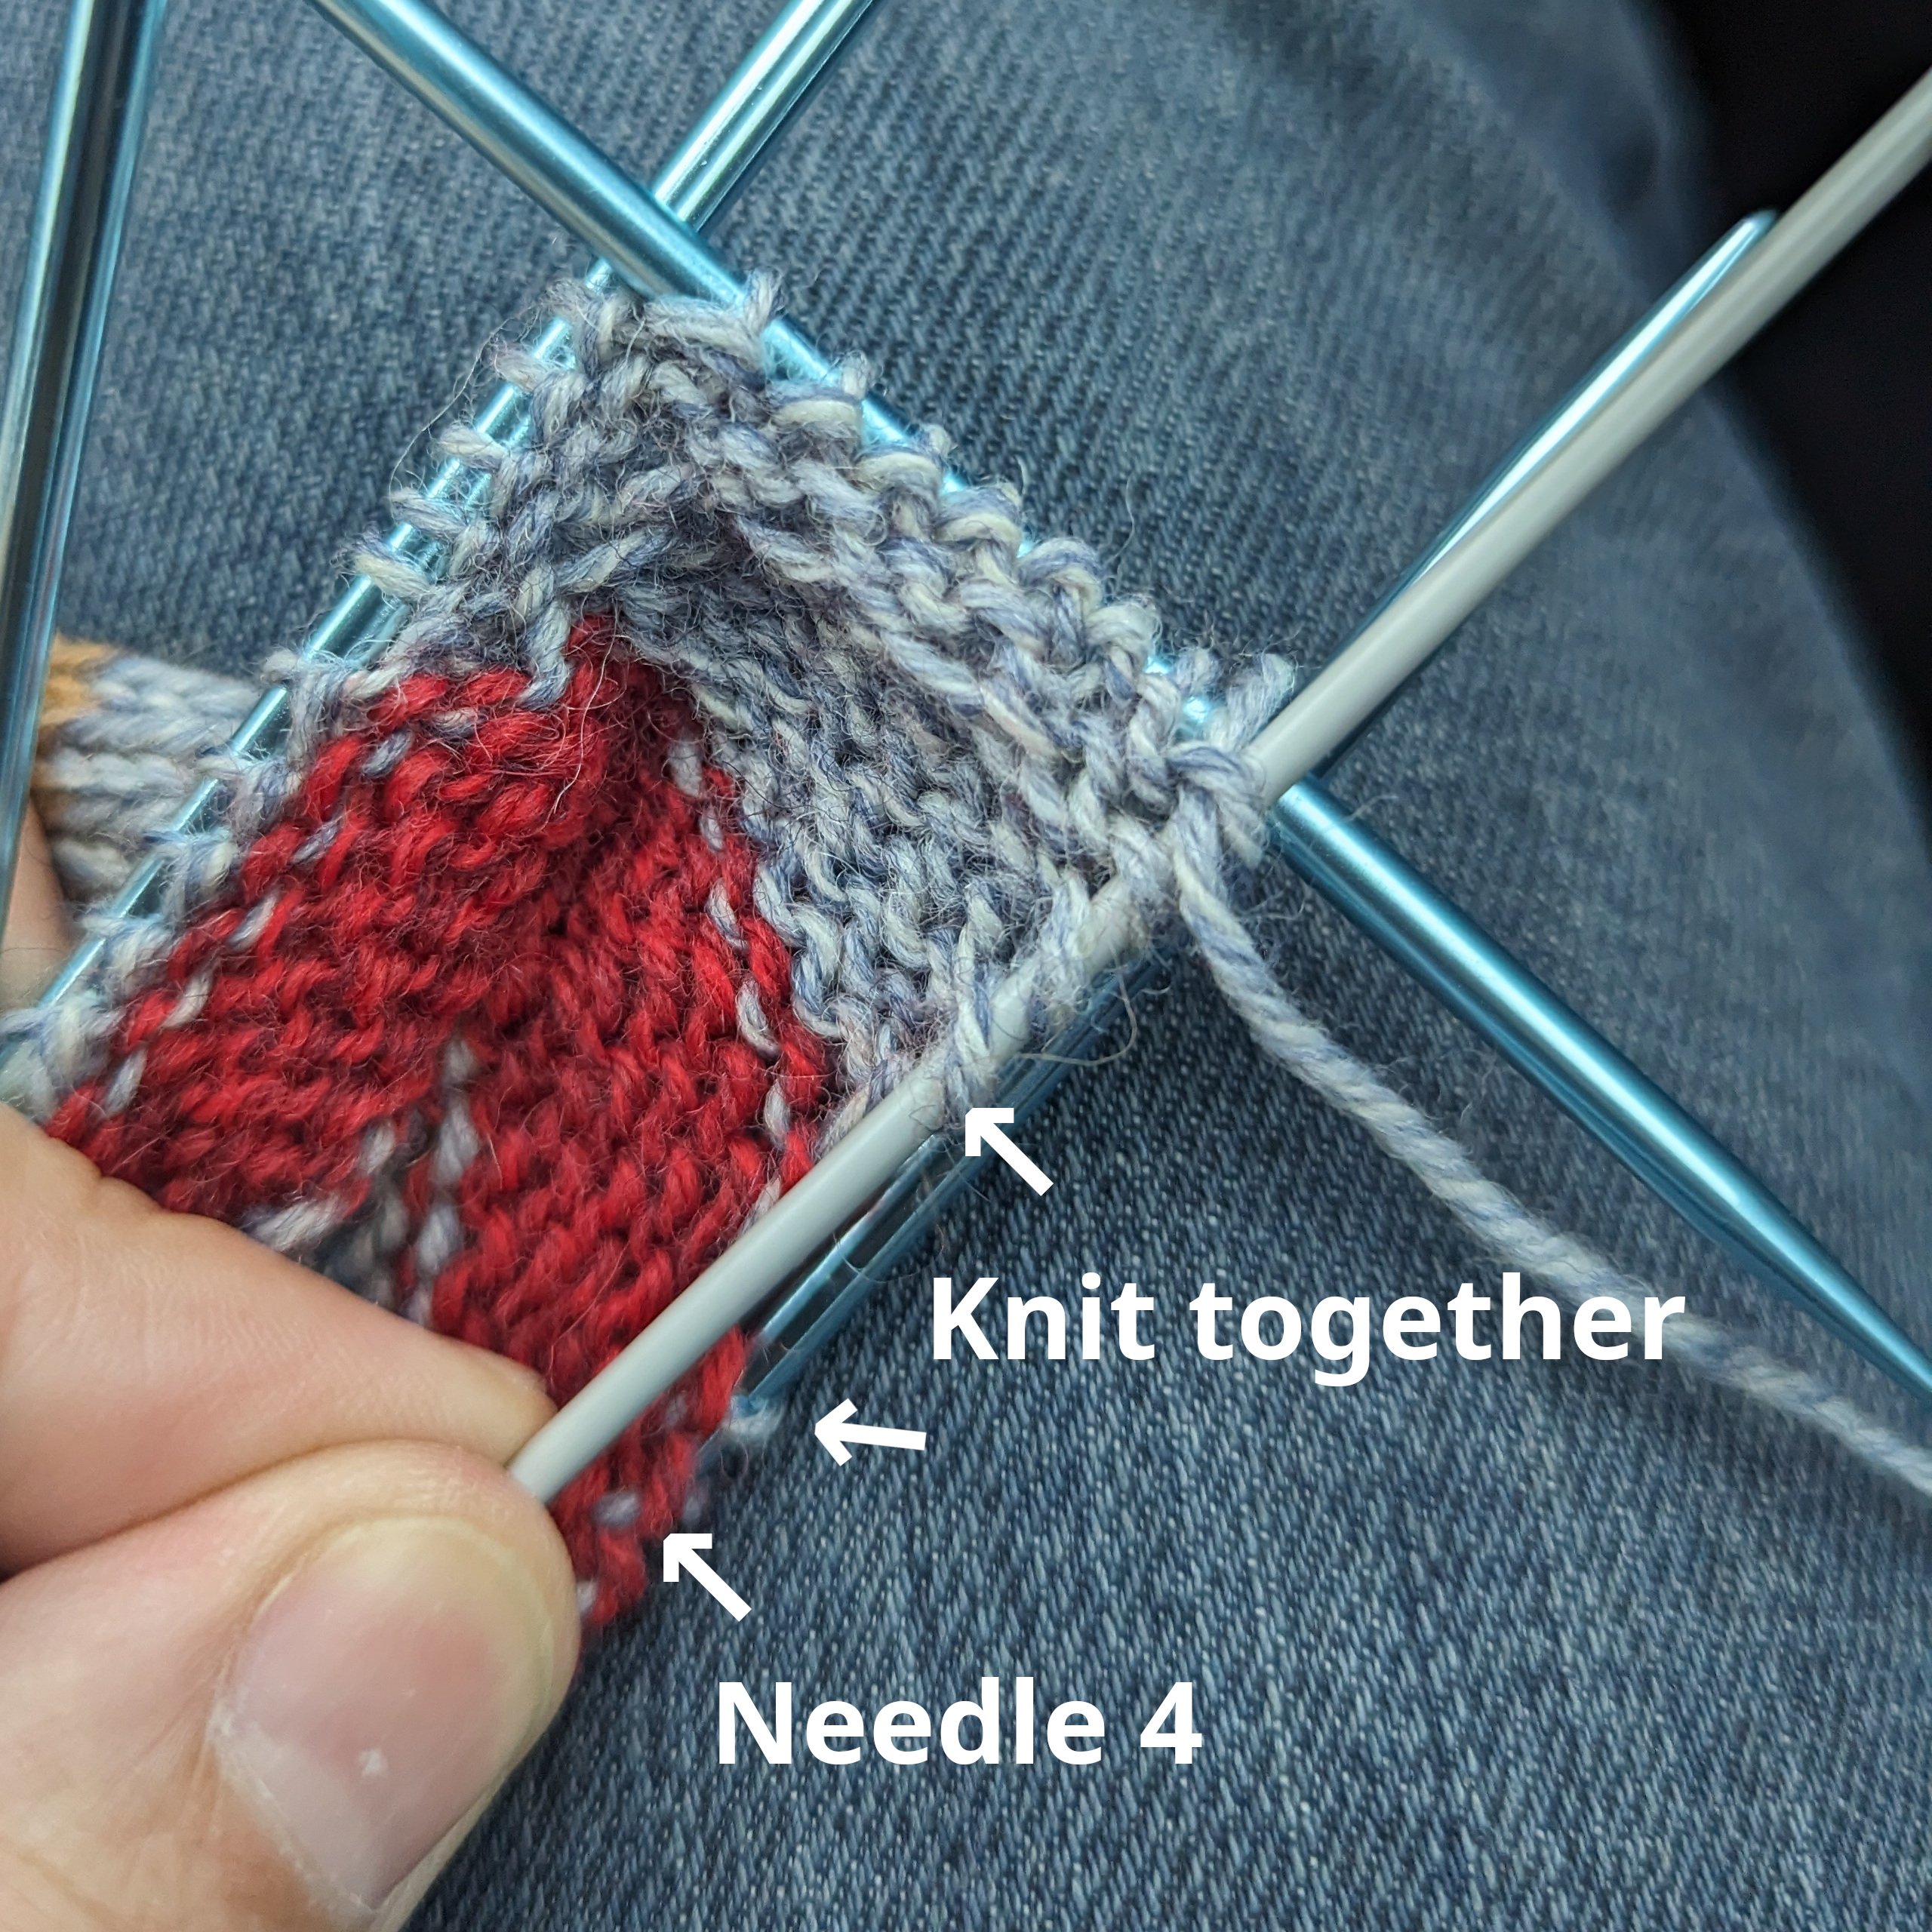
On this first selvedge, the steps are to:
- Purl through the backloop to the second last selvedge stitch.
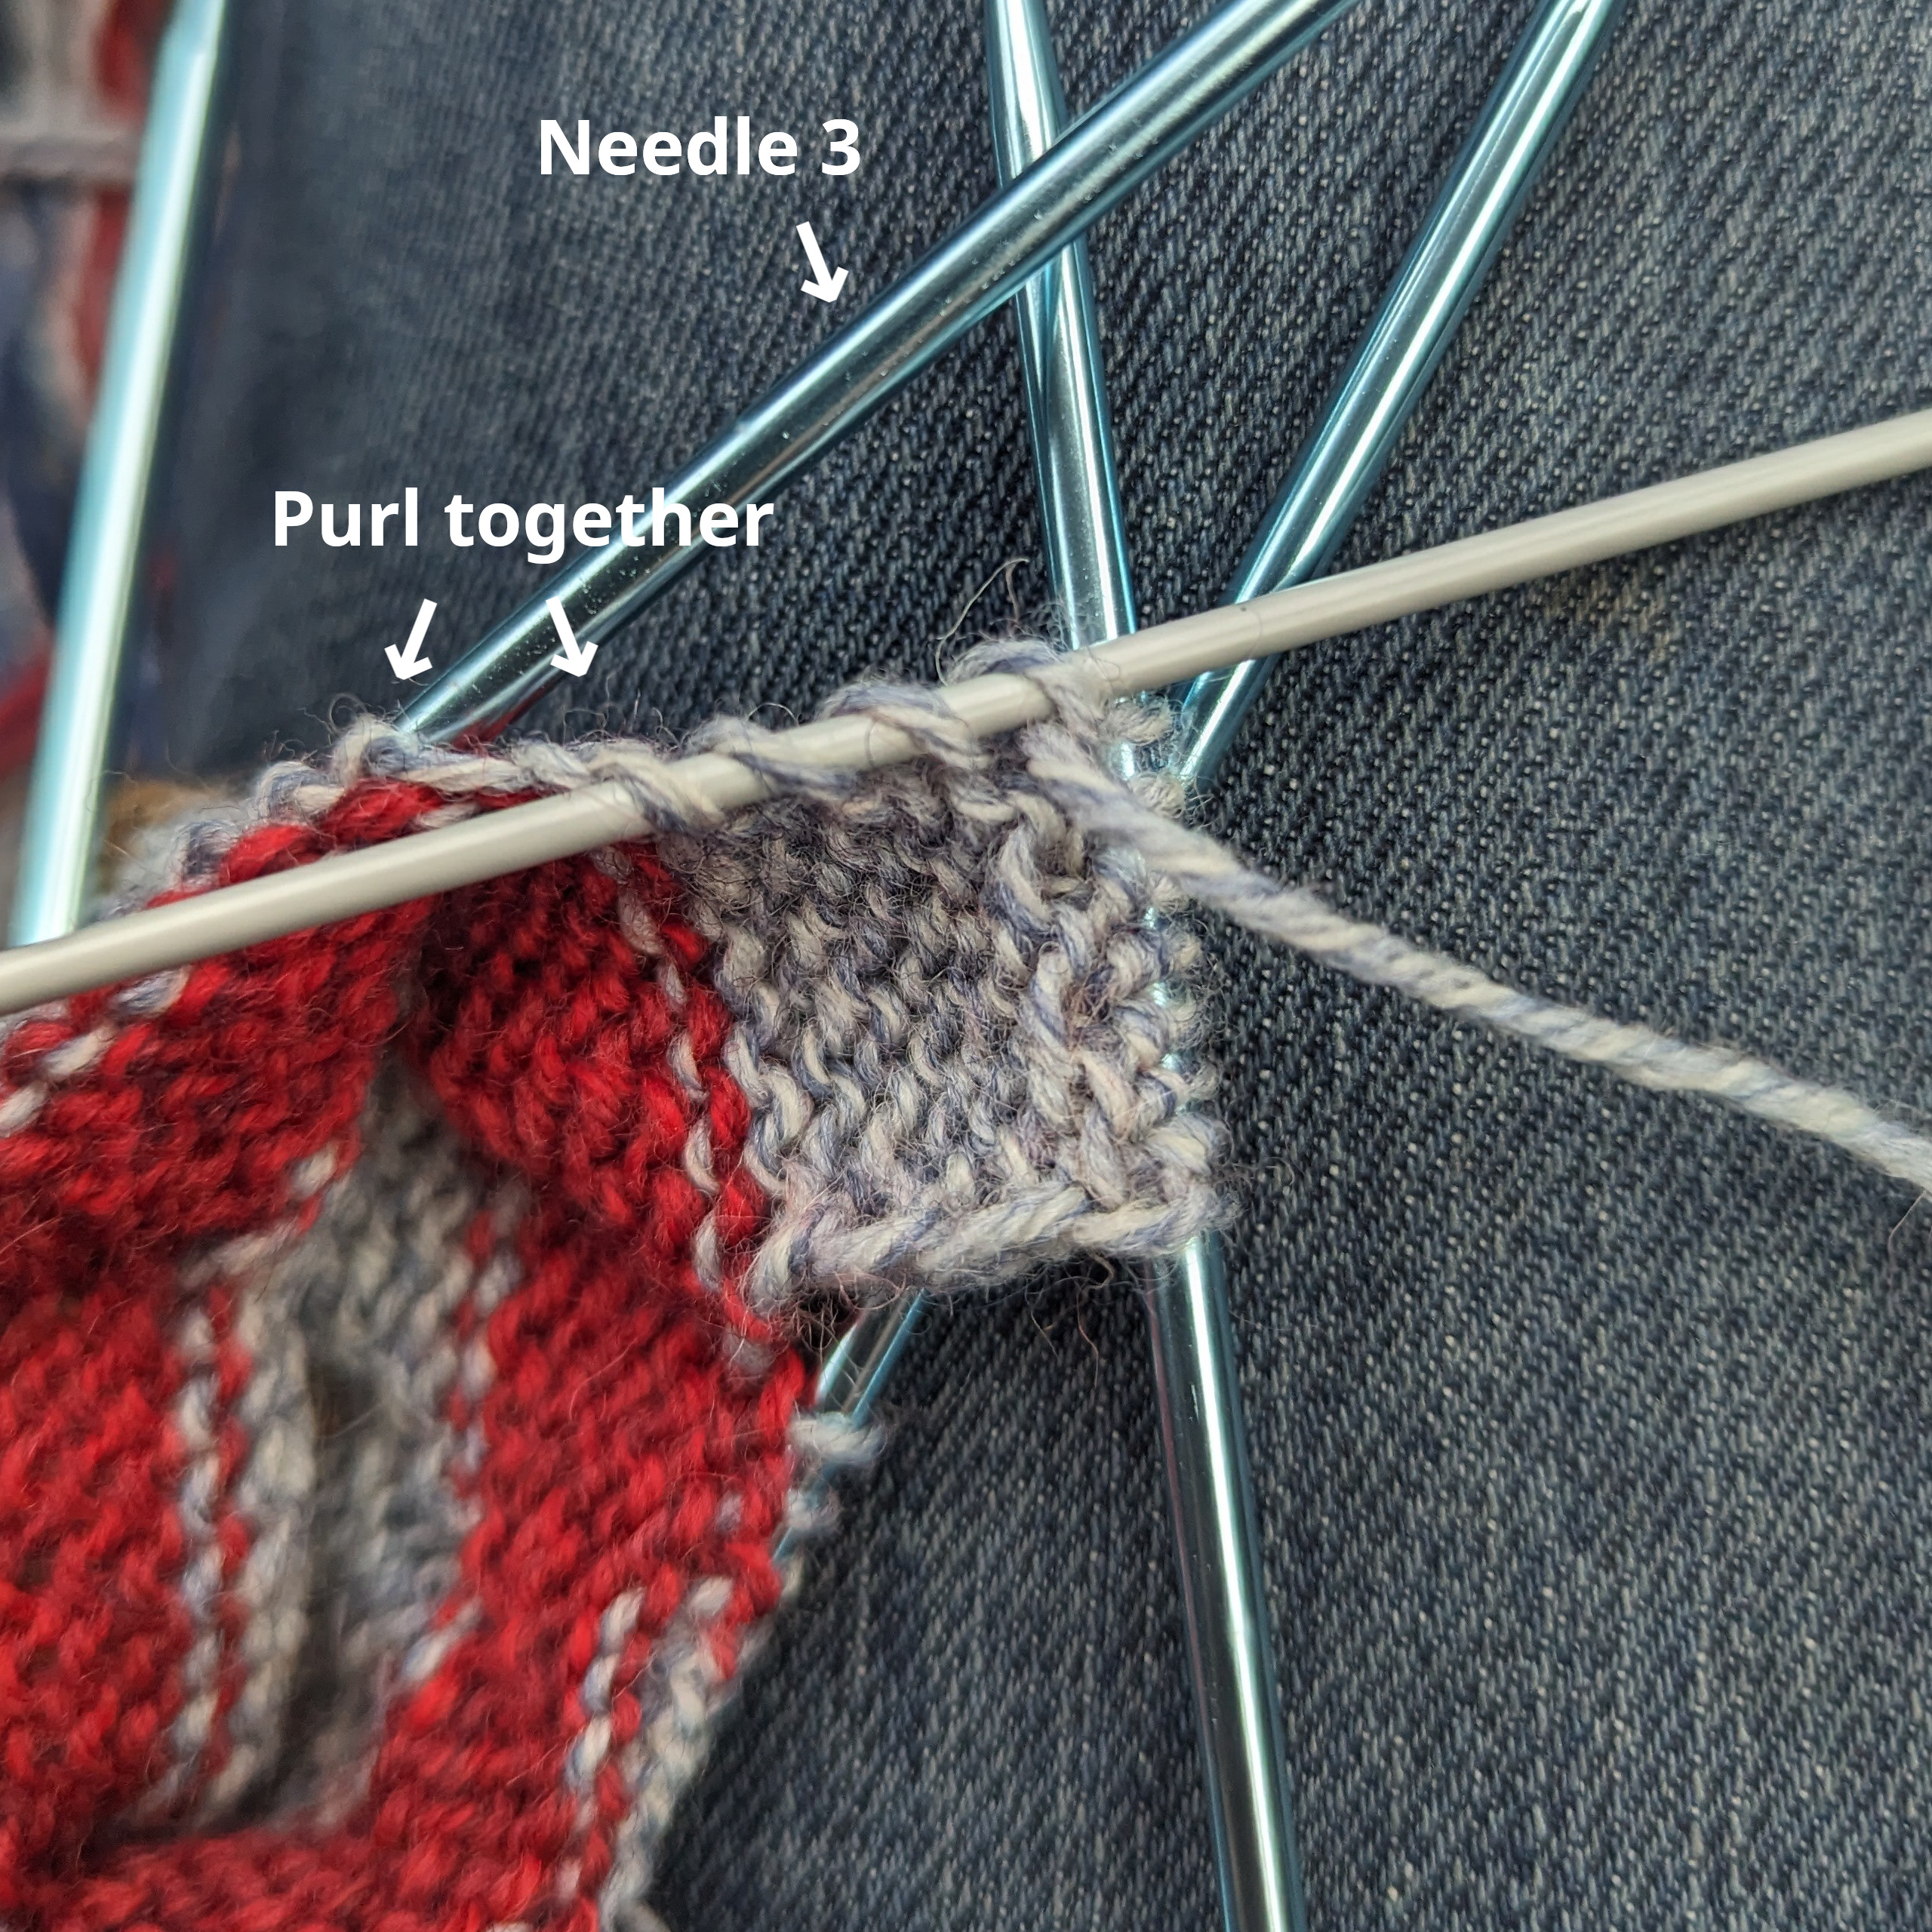
- Slip the last stitch purlwise through the backloop, then place it on needle 3 (the goal is to twist the stitch).
- Purl the last selvedge stitch and the first gusset stitch together.
- Wrap and turn (and optionally place a stitch marker).3
Note, it’s not uncommon at this point to find there’s a hole in the fabric at the join between the flap selvedge and the gusset. If this is a problem, you can lift and twist a stitch between the flap and gusset and purl it together with the other two stitches.
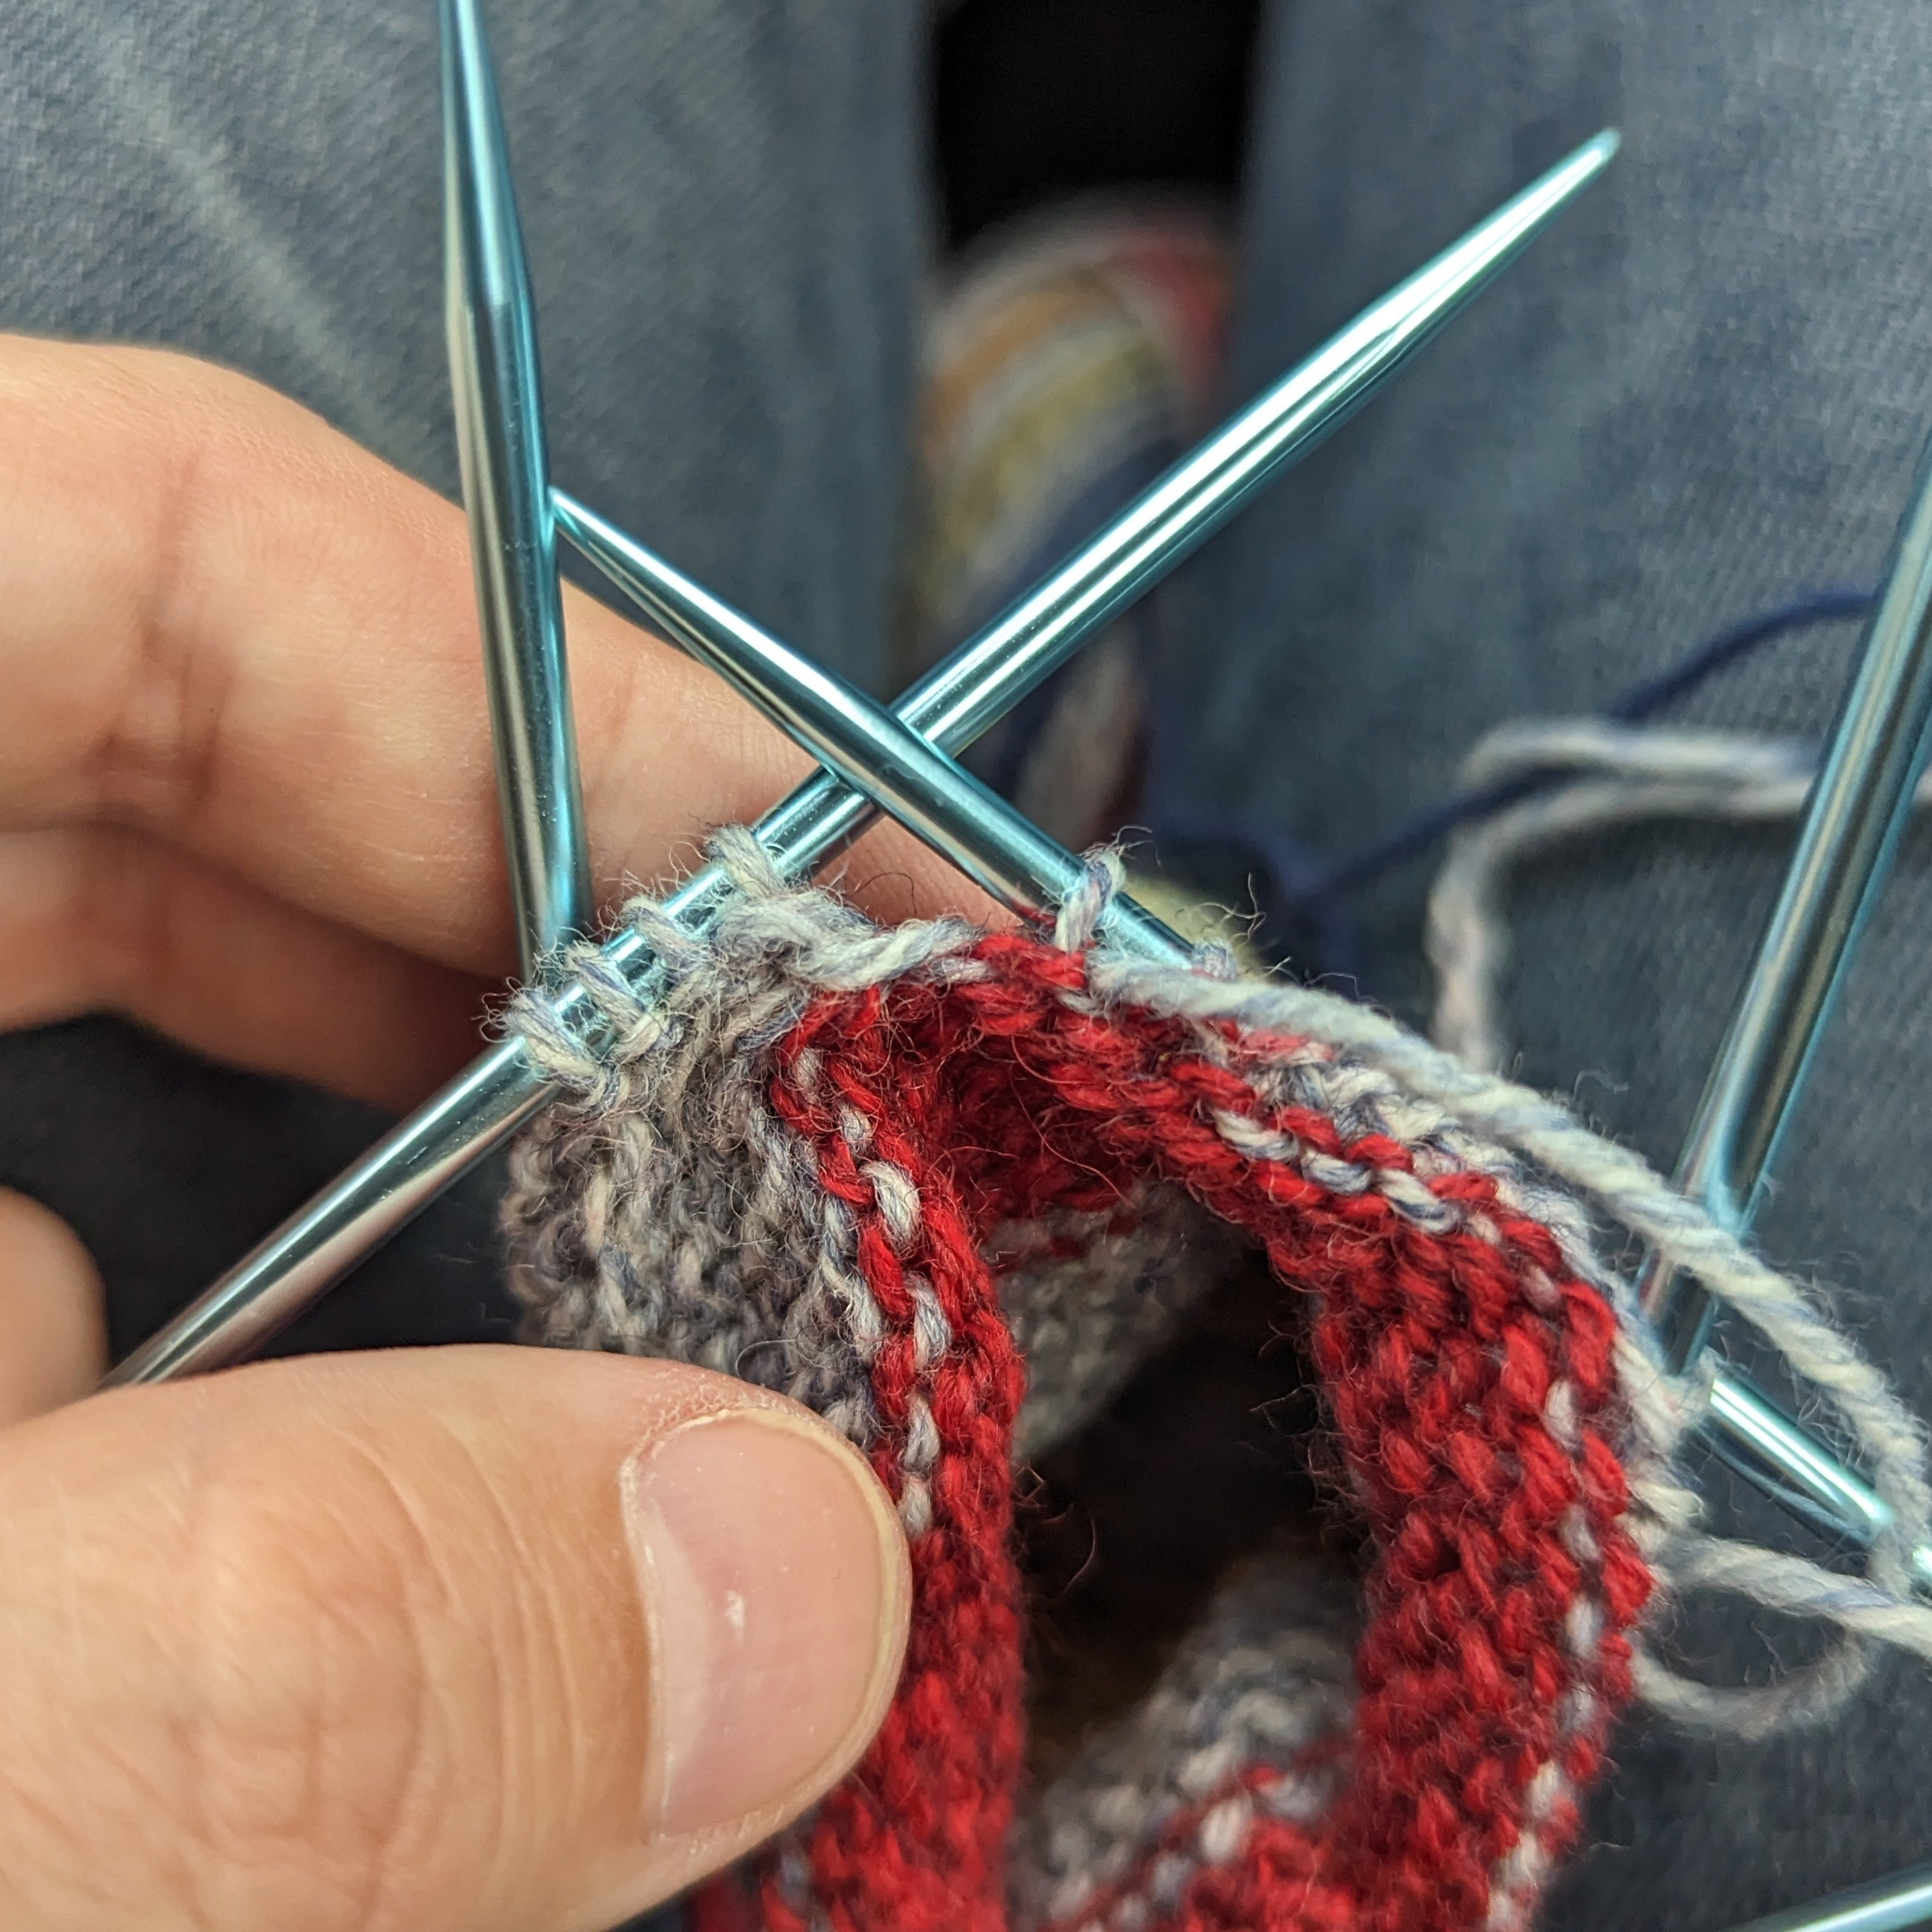
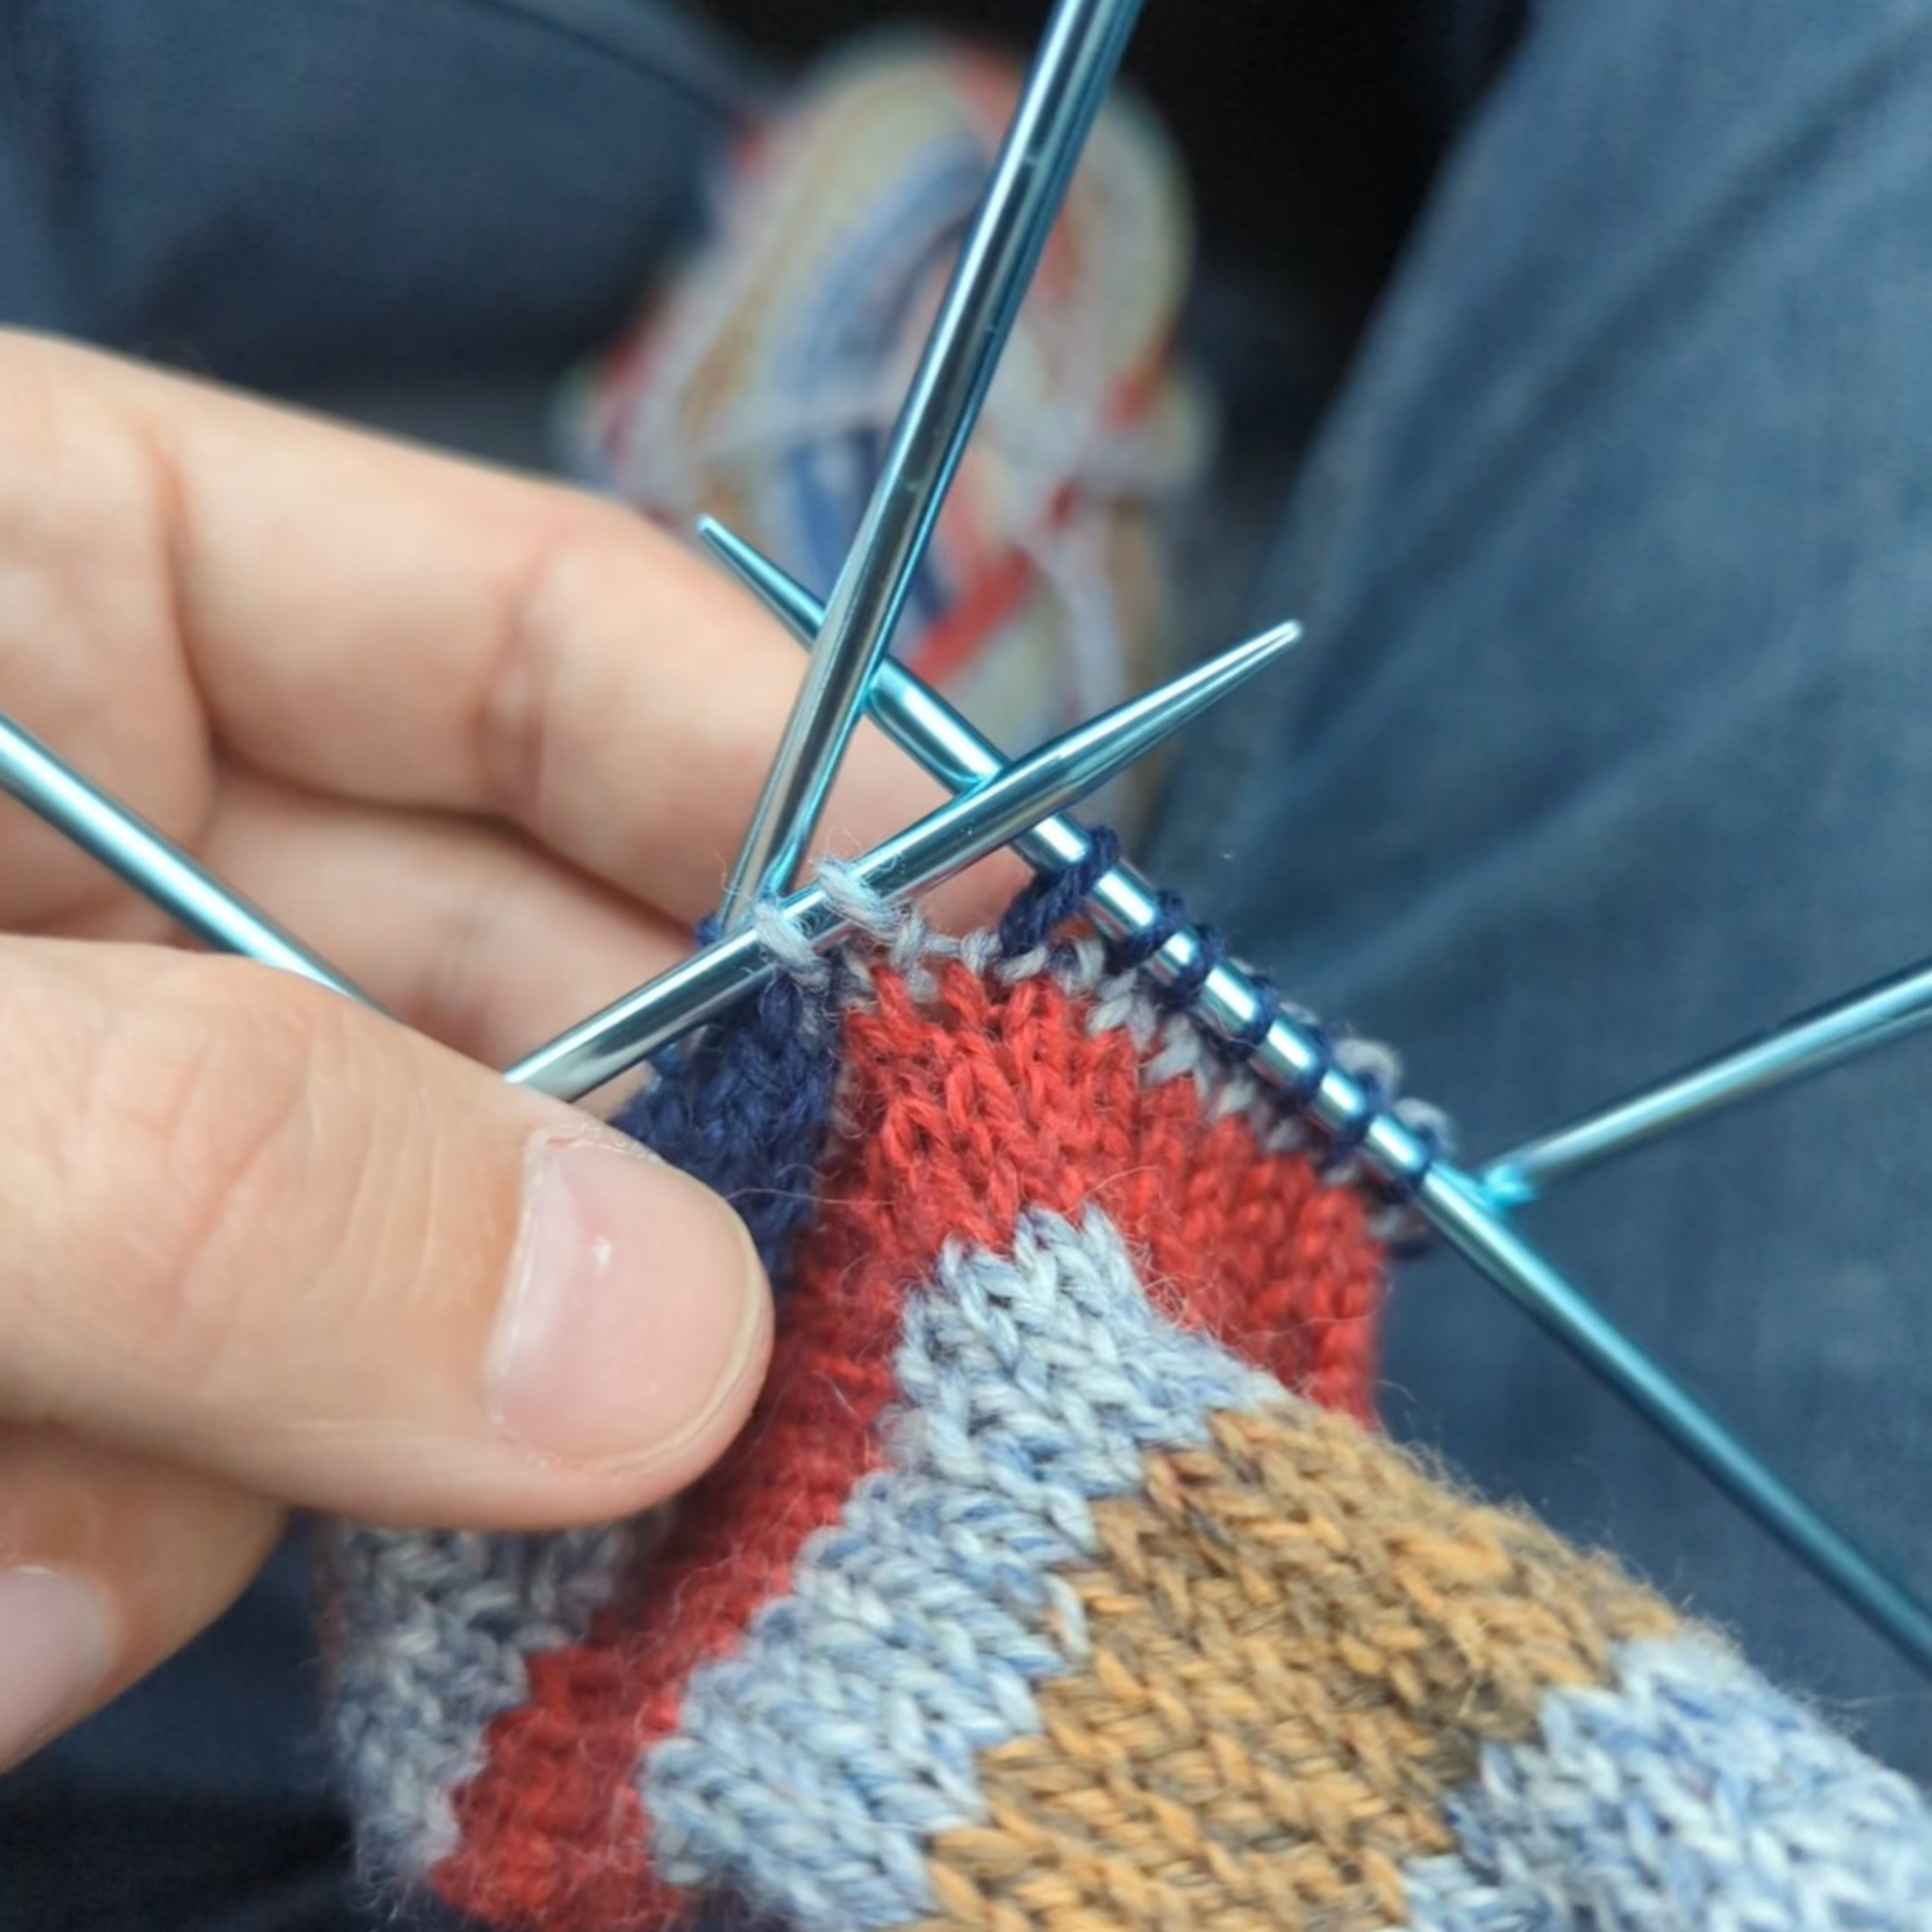
After the turn you’ll knit back across the selvedge stitches and the flap stitches. Then you’ll pick up the other selvedge stitches, as shown in the photo. Note the way these stitches are set up. If picked up as depicted, when you knit across these stitches through the frontloops they will naturally twist.
The procedure at this point should be familiar:
- Knit through the frontloops to the second last selvedge stitch.
- Slip the last stitch knitwise, then place it on needle 4.
- Knit the last selvedge stitch and the first gusset stitch together.
- Wrap and turn (and optionally place a stitch marker).
Similarly, you may find you need to lift and twist a stitch between the flap and the gusset and knit it together with the other two in order to close any visible gaps.
At this point you should have the wrong side of the fabric facing you.
In the remaining process, the goal is to gradually build up the walls of the heel cup while joining up the heel with the gussset. So, first, you will:
- Purl back across that selvedge, the heel flap, and then to the second last stitch of the first selvedge.
- Purl the last selvedge stitch and the first gusset stitch together4.
- Wrap and turn.
Then, you’ll repeat the process on the right side, knitting across the heel stitches to the second last selvedge stitch, then knitting the last selvedge stitch and the first gusset stitch together, then again wrapping and turning.
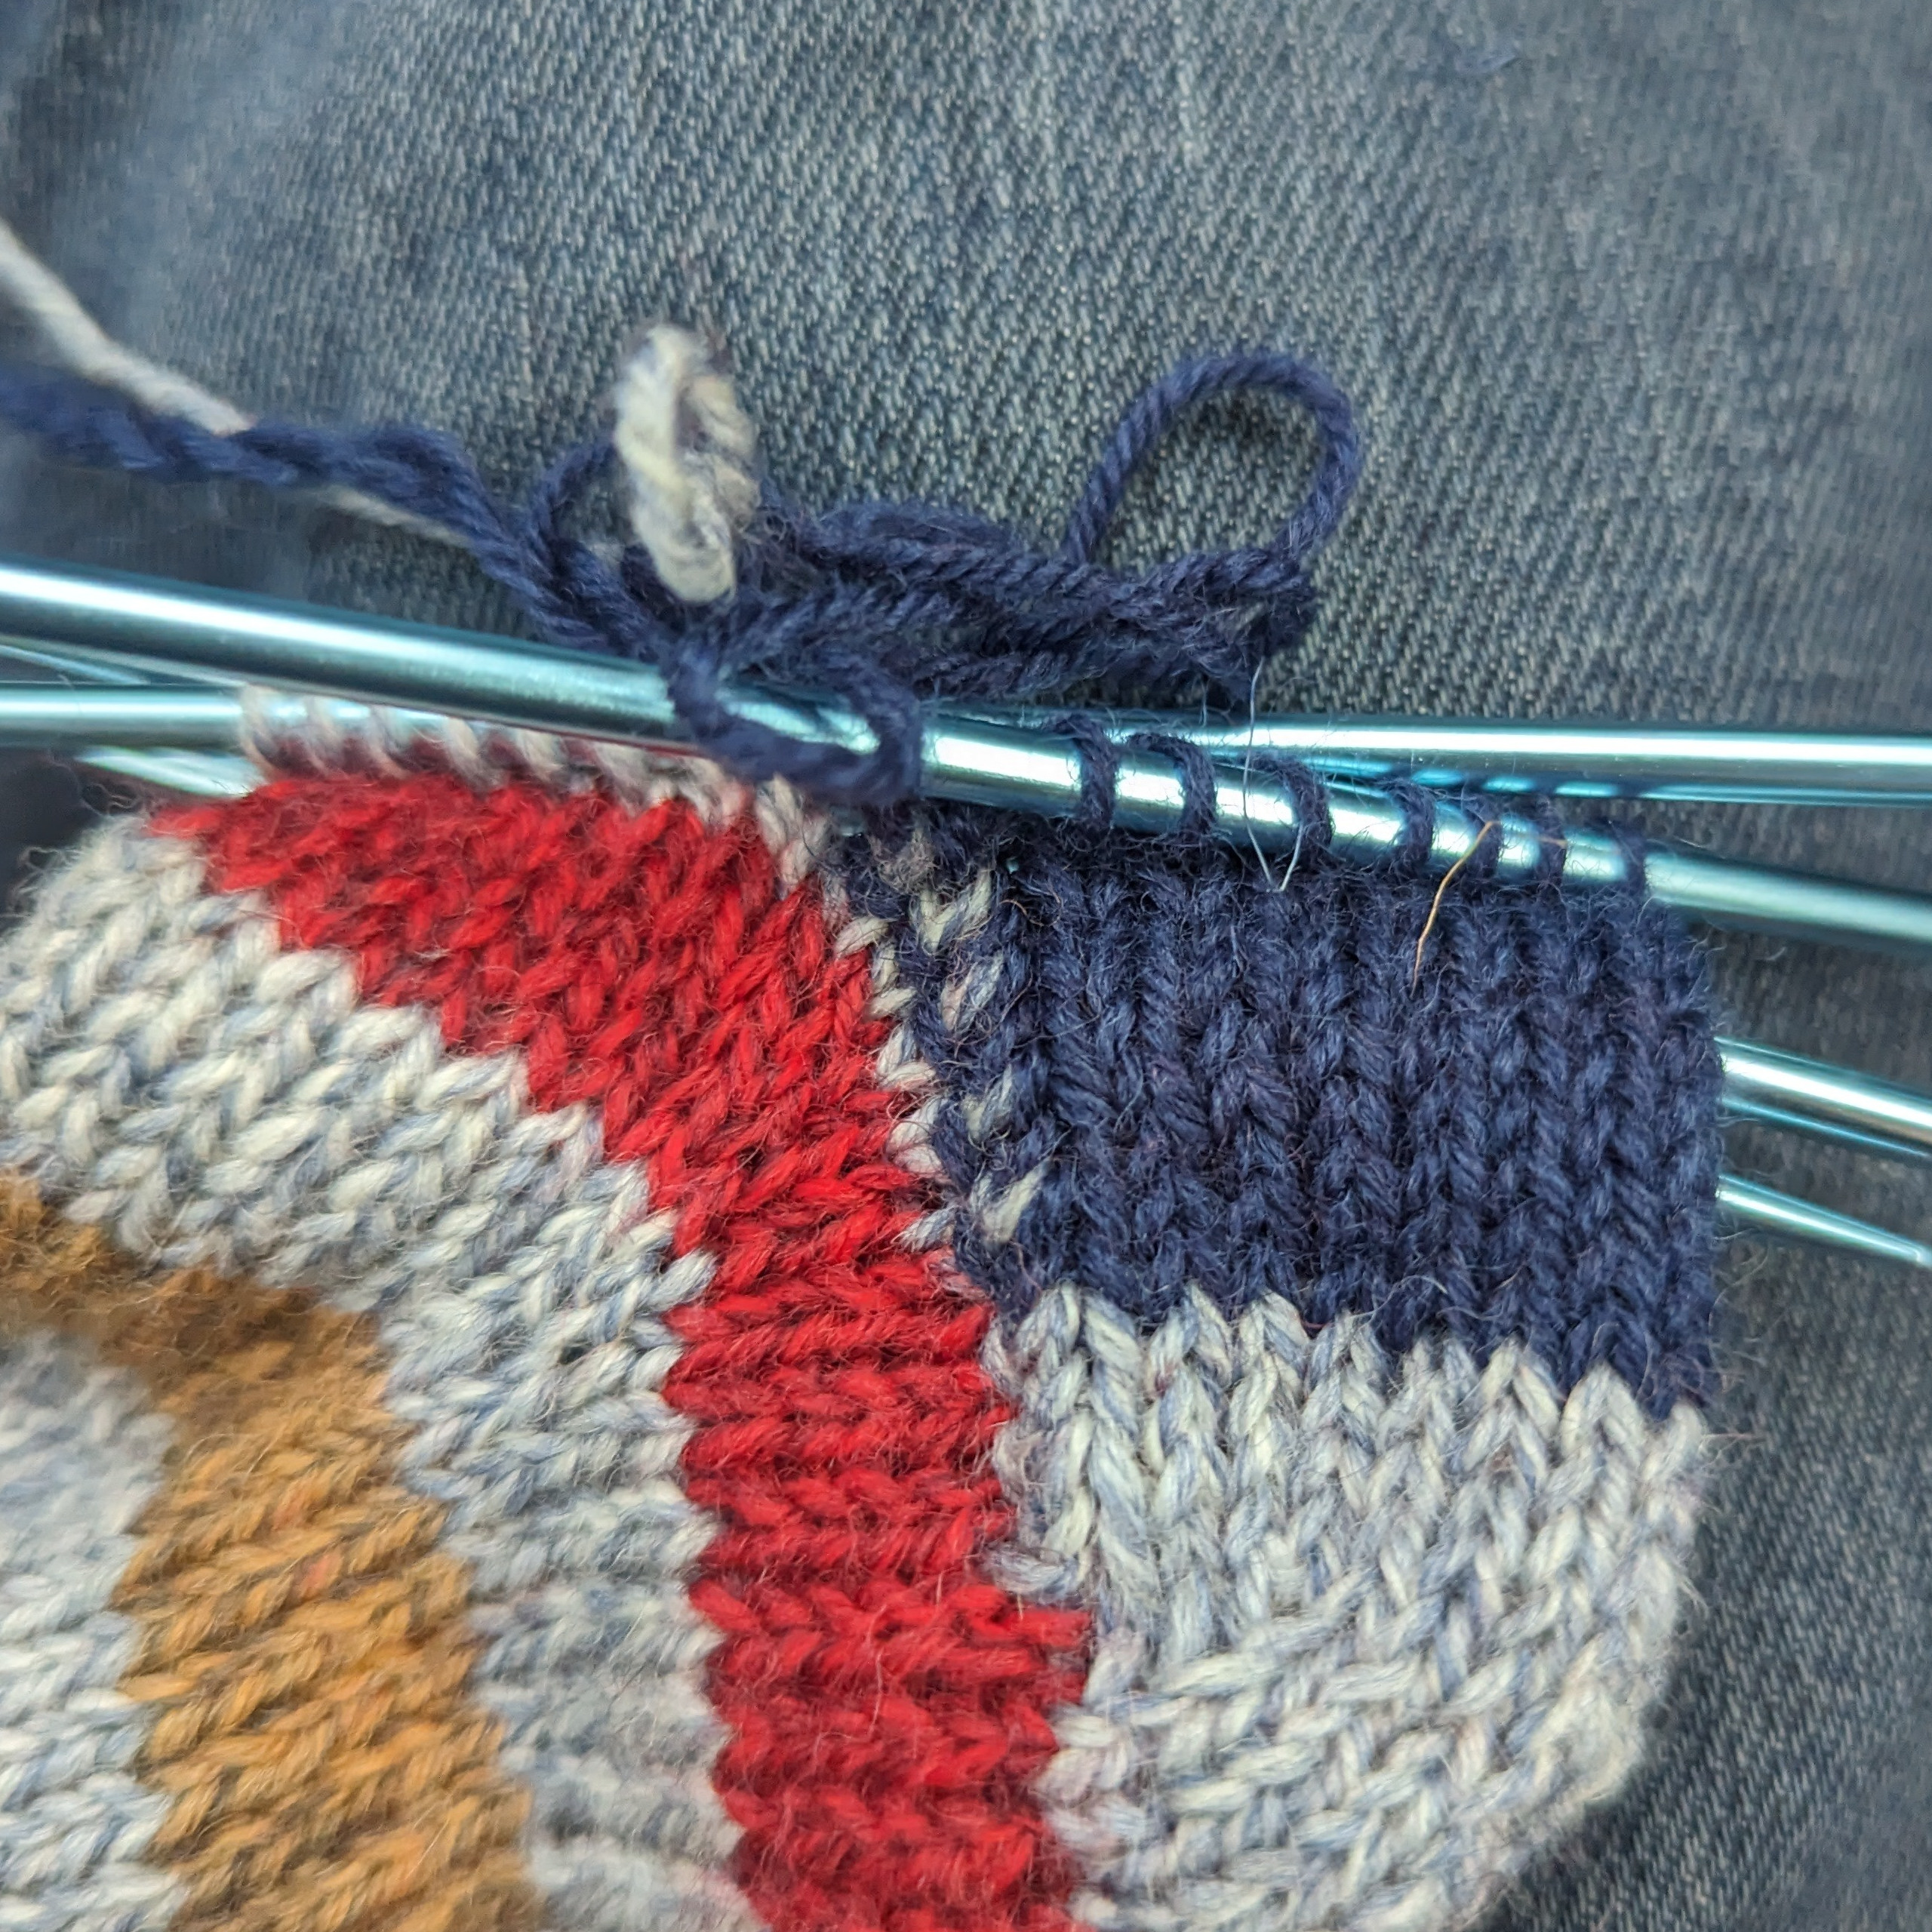
Repeat this process, back and forth across the heel stitches, until there are no more gusset stitches remaining. In the photo you can see the line of decreases joining the flap to the gusset (the gray yarn is the gusset stitch while the dark blue is from the flap).
You can now rearrange these stitches across four needles in preparation for working the leg and cuff.
Leg and cuff
Now, if you got lucky with the length of your heel flap and the number of gusset stitches, you should be back to the original number of stitches (in fact, the way this example sock as been set up, that’s exactly what should happen, and you should be back to 32 stitches).
If this is the case, you can now begin knitting the leg, which, in our sample, is just repeated knit rounds to the desired length and ending with a 1x1 rib for a few rows. If you decided to apply some sort of motif to the top of the foot, you can pick that back up and either continue or extend it around the rest of the leg.
The one wrinkle will be in the first round at the joint between needles 2 and 3. It’s quite likely you’ll end up with a gap in the fabric at this point. Again, it can be helpful to lift and twist a stitch and then decrease that stitch in the last stitch of needle 2.5
Now, I often end up with too many stitches, so at this point I usually have to include additional decreases each round to remove the excess stitches. I do this by including a left leaning decrease at the start of needle 3, and a right leaning decrease at the end of needle 4, so that the line of decreases follows the line of the gusset.
Bind off
It’s critical to use a nice, stretchy bind-off for toe-up socks. I prefer Jeny’s surprisingly stretchy bind-off, as it’s fairly easy to execute if you’re familiar with a regular chain bind-off, and looks nice and clean.
And that’s it! In theory you just knitted your first sock!
What now?
Well, first off, you should probably try making a properly sized sock, followed by, you know, a second one. You should be able to follow these exact same steps while adjusting the measurements as appropriate. And remember you can try on as you go!
Beyond that, you can experiment with stitch patterns or start to noodle around with alternative cast-on methods, or toe or heel styles.
Have fun!
-
The technical term for this is “negative ease”. ↩
-
I’d estimate it took me about 2 hours to put together this sample. ↩
-
This is a short row knitting technique where you move the working yarn from the front of the piece to the back, slip the next stitch purl-wise, bring the working yarn from the back to the front, then return the stitch back to the right needle. Then turn the piece around so you can knit back. ↩
-
This is the stitch you wrapped earlier so it should be pretty easy to spot visually. ↩
-
I actually do something a little more elaborate, here, and introduce an increase stitch by picking up the leg two stitches down, twisting it, then lifting the leg one row down, and then passing the twisted stitch over. I then knit that new stitch and the last stitch of needle 2 together. ↩